Building a dapp
| This article is no longer maintained. Read here for more info. |
Decentralized Applications (aka dapps or ÐApps) are web applications backed by Ethereum smart contracts. Instead of using a centralized server or database, these applications rely on the blockchain as a consensus and coordination layer. This leads to potentially unstoppable applications: anyone can spin up a copy of the frontend, and freely connect it to the public Ethereum network.
In this guide, we will see how we can use OpenZeppelin libraries such as Network JS and the hot-loader to build your dapp, as well as how the Starter Kits bind all pieces of a dapp together:
If you are in a rush, just skip over to the last section!
Connecting to the Network
When building a dapp, the first step is to connect to the Ethereum network. This usually involves the following steps:
-
If the user is running Metamask, use the injected web3 provider to access the network, and monitor for network or account changes
-
If not, fall back to a public Infura node
To avoid having to code this logic on every dapp, we built OpenZeppelin Network JS to take care of it. It provides a useWeb3 React hook for getting a web3Context based on the logic above. This web3Context object provides access to a connected web3 instance, network information, the user accounts, a function to request account access, and more.
The following snippet is a small React app that connects to the network using Metamask (falling back to Infura if not found), prompts the user for account access, and displays the user balance:
import React, { useCallback, useState, useEffect } from 'react';
import { useWeb3 } from '@openzeppelin/network/react';

function App() {
  // Get web3 context via @openzeppelin/network/react hook
  const web3Context = useWeb3(`wss://mainnet.infura.io/ws/v3/${PROJECT_ID}`);
  const { lib: web3, networkId, accounts, providerName } = web3Context;

  // Methods for requesting accounts access
  const requestAuth = (web3Context) => web3Context.requestAuth();
  const requestAccess = useCallback(() => requestAuth(web3Context), []);

  // Querying account balance
  const [balance, setBalance] = useState(0);
  const getBalance = useCallback(async () => {
    setBalance(
      accounts && accounts.length > 0
      ? (await web3.eth.getBalance(accounts[0]))
      : 'Unknown')
  }, [accounts, web3.eth, web3.utils]);
  useEffect(() => {
    getBalance();
  }, [accounts, getBalance, networkId]);

  // Show all information to the user
  return (
    <div>
      <div>Network: {networkId || 'No connection'}</div>
      <div>Your address: {accounts ? accounts[0] : 'Unknown'}</div>

      {accounts && accounts.length ? (
        <div>Accounts access granted</div>
      ) : !!networkId && providerName !== 'infura' ? (
        <button onClick={requestAccess}>Request Access</button>
      ) : (
        <div>No accounts access</div>
      )}
    </div>
  );
}
In the snippet above, with just the first two lines we get access to the Ethereum network via Metamask and falling back to Infura, as well as information on the network, provider, and even user accounts - all of this through the useWeb3 hook provided by Network JS.
You can easily enable meta-transaction support in your dapp when using Network JS by adding a gsn option to the React hook.
|
To learn more, head to our step-by-step tutorial on Building a Dapp from Scratch using the Networks library.
Hot-loading Contracts
Now that we have a working connection to the Ethereum network, we can start interacting with the contracts we have coded and deployed using the OpenZeppelin CLI.
While we could create a regular web3 contract instance from ABI and address, we will instead leverage contract upgrades to hot-load our contracts.
This means that once we deploy and load a contract in our running React dapp, the app will automatically pick up any changes to the Solidity code and upgrade the contract during development. The OpenZeppelin Hot Loader will watch all your Solidity contracts for changes, and automatically recompile and upgrade the contract on the local development network - keeping the same address and state, and just changing the code to the new version you wrote.
| The Hot Loader is a webpack plugin. It will not work if you are using a different bundler for your application. |
To set up the hot-loader, you need to install @openzeppelin/solidity-loader and json-loader, and add the following rule to your webpack configuration:
test: /\.sol$/,
use: [
  { loader: 'json-loader' },
  {
    loader: '@openzeppelin/solidity-loader',
    options: {
      network: 'development',
      disabled: false
    },
  },
],
If you are using create-react-app, you may need to either eject the application to modify the webpack configuration, or use react-app-rewired.
|
Then, just load the contract Solidity file from your client code, which will go through the Hot Loader. Whenever you modify your contract source, the loader will automatically upgrade the instance to the latest code for you.
// Load web3 context using @openzeppelin/network
const { networkId, lib: web3 } = useWeb3Network('http://127.0.0.1:8545');

// Load contract artifact
const Box = require('../../contracts/Box.sol');

// Load deployed instance
const [box, setBox] = useState(undefined);
if (!box && Box && Box.networks && networkId) {
  const deployedNetwork = Box.networks[networkId.toString()];
  if (deployedNetwork) {
    setBox(new web3.eth.Contract(Box.abi, deployedNetwork.address));
  }
}
For detailed setup instructions, follow our step-by-step tutorial on Enabling the Hot Loader in a React web application.
Kickstarting your Dapp
As you have seen so far, setting up a dapp involves a fair amount of boilerplate and configuration, including creating an OpenZeppelin CLI project, initializing a new webpack client app, configuring network access and loading your contracts.
To kickstart this process, we have built the OpenZeppelin Starter Kits. Starter Kits are preconfigured dapps with several OpenZeppelin libraries, Infura connections, and Rimble UI components, ready to start developing right away.
You can start a new project from a starter kit using the oz unpack CLI command:
$ oz unpack starter
✓ Kit downloaded and unpacked
The kit is ready to use.
Quick Start
Run your local blockchain:
> ganache-cli --deterministic
Initialize the OpenZeppelin project:
> openzeppelin init app
Go to the client directory:
> cd client
Run the React app:
> npm run start
Continue in your browser!
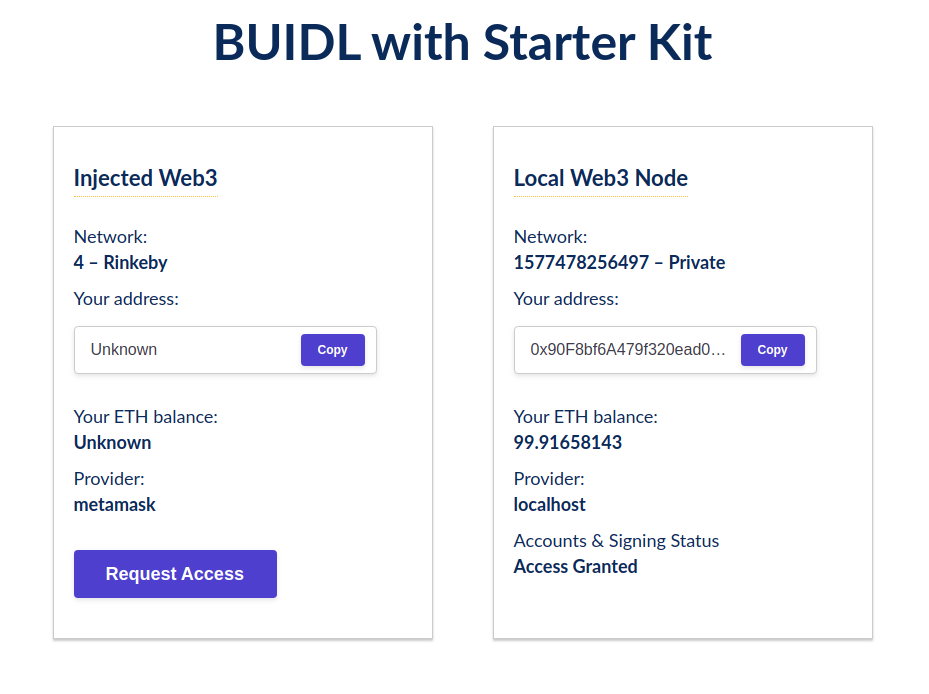
More at https://github.com/OpenZeppelin/starter-kit/tree/stableThis will unpack a preconfigured React dapp, with a network connection set up to both Metamask and the local node. Each box in the dapp shows the information from each connection, each obtained from a different web3Context: network ID, provider, accounts, and balance. On the Metamask side, you need to request access to the user accounts before obtaining them from the plugin.
Having this initial setup, you can now modify it to start building your own application on top of it - as you would do in a vanilla create-react-app setup.
If you want to learn more about using Starter Kits, unpack the tutorial kit instead of starter: it will guide you through the process of deploying and interacting with contracts from a dapp. You can also check out the list of all starter kits available to unpack.