Actions
Actions allow you to implement custom app logic for on-chain and off-chain operations. You can enable automated responses to threats detected by the Monitor and Workflows modules.
Use cases
- Automate smart contract operations
- Execute actions as response to a Monitor alert
- Automate Workflow steps with Actions
- Call external APIs and interact with other smart contracts
Actions
Actions are automated Javascript pieces of code that can be executed via triggers.
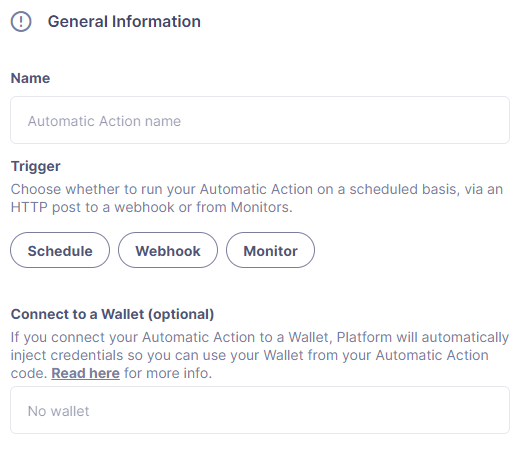
Triggers
The following triggers are supported:
- Schedule: Choose a frequency, and Defender will invoke the function at the specified interval. Note that the specified interval is between two consecutive execution starts, not between the end of one run and the beginning of the next one. Alternatively, it’s possible to specify when the action should run using cron expressions.
- Webhook: Defender will create a webhook URL for the action, which will be executed whenever an HTTP POST request is sent to that endpoint. The URL can be regenerated at any time. When invoked, the HTTP request information will be injected into the action, and the HTTP response will include the action run info along with any data returned from the action.
When sending requests to the webhook, make sure to include the Content-Type: application/json header. We have a strict requirement for this header to be present in the request. Otherwise you will see 415 Unsupported Media Type error.
- Monitor: Triggered by a Defender Monitor. It will contain a body property with the details for the triggering event that you can use to run custom logic.
Environment
Actions run in a node 20 environment with 256mb RAM and a 5-minute timeout. The code for each action must be smaller than 5mb in size. For ease-of-use, a set of common dependencies are pre-installed in the environment. The latest action dependenacy version v2025-01-16 has the following dependencies:
"@datadog/datadog-api-client": "^1.0.0-beta.5",
"@fireblocks/fireblocks-web3-provider": "^1.3.1",
"@gnosis.pm/safe-core-sdk": "^0.3.1",
"@gnosis.pm/safe-ethers-adapters": "^0.1.0-alpha.3",
"@openzeppelin/defender-admin-client": "1.54.6",
"@openzeppelin/defender-autotask-client": "1.54.6",
"@openzeppelin/defender-autotask-utils": "1.54.6",
"@openzeppelin/defender-kvstore-client": "1.54.6",
"@openzeppelin/defender-relay-client": "1.54.6",
"@openzeppelin/defender-sdk": "1.15.2",
"@openzeppelin/defender-sentinel-client": "1.54.6",
"axios": "^1.7.4",
"axios-retry": "3.5.0",
"ethers": "5.5.3",
"fireblocks-sdk": "^2.5.4",
"graphql": "^15.5.1",
"graphql-request": "3.4.0",
"web3": "1.9.0"
Defender dependencies that are not under the @openzeppelin namespace are now deprecated. Impacted dependencies are defender-admin-client, defender-autotask-client, defender-autotask-utils, defender-kvstore-client, defender-relay-client, defender-sentinel-client
If other dependencies are needed, a JavaScript module bundler, such as rollup or webpack, can be used. Refer to this sample project to learn how. Contact us to add a dependacy you think other users would find useful!
We love Typescript in the OpenZeppelin development team, and we hope you do too! If you want to write your actions in TypeScript, you’ll need to first compile them using tsc or via your bundler of choice, and then upload the resulting JavaScript code. Unfortunately, we don’t support coding directly in TypeScript in the user interface. All defender-sdk packages are coded in TypeScript and are packaged with their type declarations. You can also use the openzeppelin/defender-sdk-action-client package for type definitions for the event payload.
Runtime Upgrades
Actions must be kept updated with recent Node.js runtime versions to ensure they run in an up-to-date and secure environment. Occasionally, we enforce runtime upgrades to all Actions to a minimum runtime version. The process consists of:
- Sending email notifications before the automatic upgrade.
- Displaying a UI banner under the actions page to warn about the upcoming automatic upgrade.
- Making a forum announcement.
- On the automatic upgrade day, Defender automatically upgrades all action runtimes to the minimum required version.
we suggest checking your Actions, making necessary changes, and upgrading in advance to prevent any breaking changes.
Defining code
Handler function
Your code must export an async handler function that will be invoked on each execution of the action.
exports.handler = async function(event)
  // Your code here
The following interface contains the event types injected by Defender when invoking an Action:
export interface ActionEvent
   /**
   * Internal identifier of the relayer function used by the relay-client
   */
   relayerARN?: string;

   /**
   * Internal identifier of the key-value store function used by the kvstore-client
   */
   kvstoreARN?: string;

   /**
   * Internal credentials generated by Defender for communicating with other services
   */
   credentials?: string;

   /**
   * Read-only key-value secrets defined in the Action secrets vault
   */
   secrets?: ActionSecretsMap;

   /**
   * Contains a Webhook request, Monitor match information, or Monitor match request
   */
   request?: ActionRequestData;
   /**
   * actionId is the unique identifier of the Action
   */
   actionId: string;
   /**
   * Name assigned to the Action
   */
   actionName: string;
   /**
   * Id of the the current Action run
   */
   actionRunId: string;
   /**
   * Previous Action run information
   */
   previousRun?: PreviousActionRunInfo;
Relayer integration
If you connect your automatic action to a relayer, then Defender will automatically inject temporary credentials to access the relayer from the action code. Simply pass the event object to the relayer client in place of the credentials:
const  Defender  = require('@openzeppelin/defender-sdk');

exports.handler = async function(event)
  const client = new Defender(event);

  // Use relayer for sending txs or querying the network...
This allows you to send transactions using the relayer from actions without having to set up any API keys or secrets. Furthermore, you can also use the relayer’s JSON RPC endpoint for making queries to any Ethereum network without having to configure API keys for external network providers.
We also support ethers.js for making queries or sending transactions via the relayer. To use ethers.js replace the above snippet with this:
const  DefenderRelaySigner, DefenderRelayProvider  = require('defender-relay-client/lib/ethers');
const ethers = require('ethers');

exports.handler = async function(event)
  const provider = new DefenderRelayProvider(event);
  const signer = new DefenderRelaySigner(event, provider, { speed: 'fast' );
  // Use provider and signer for querying or sending txs from ethers, for example...
  const contract = new ethers.Contract(ADDRESS, ABI, signer);
  await contract.ping();
}
If you prefer web3.js:
const  DefenderRelayProvider  = require('defender-relay-client/lib/web3');
const Web3 = require('web3');

exports.handler = async function(event)
  const provider = new DefenderRelayProvider(event, { speed: 'fast' );
  const web3 = new Web3(provider);
  // Use web3 instance for querying or sending txs, for example...
  const [from] = await web3.eth.getAccounts();
  const contract = new web3.eth.Contract(ABI, ADDRESS,  from );
  await contract.methods.ping().send();
}
Monitor invocations
Actions triggered from a Monitor can have two types of body properties and scheme, depending what type of Monitor triggered the action:
- In the case of a Defender monitor, the body will contain the monitor event schema.
If the action is written in TypeScript, BlockTriggerEvent type from the defender-sdk-action-client package can be used.
exports.handler = async function(params)
  const payload = params.request.body;
  const matchReasons = payload.matchReasons;
  const sentinel = payload.sentinel;

  // if contract monitor
  const transaction  = payload.transaction;
  const abi = sentinel.abi;

  // custom logic...
Webhook invocations
When an action is invoked via a webhook, it can access the HTTP request info as part of the event parameter injected in the handler. Likewise, the return value will be included in the result field of the HTTP response payload.
exports.handler = async function(event)
  const {
    body,    // Object with JSON-parsed POST body
    headers, // Object with key-values from HTTP headers
    queryParameters, // Object with key-values from query parameters
   = event.request;

  return
    hello: 'world' // JSON-serialized and included in the `result` field of the response
  ;
}
At the moment only JSON payloads are supported, and only non-standard headers with the X- or Stripe- prefix are provided to the action.
A sample response from the webhook endpoint looks like the following, where status is one of success or error, encodedLogs has the base64-encoded logs from the run, and result has the JSON-encoded value returned from the execution.
  "autotaskRunId": "37a91eba-9a6a-4404-95e4-38d178ba69ed",
  "autotaskId": "19ef0257-bba4-4723-a18f-67d96726213e",
  "trigger": "webhook",
  "status": "success",
  "createdAt": "2021-02-23T18:49:14.812Z",
  "encodedLogs": "U1RBU...cwkK",
  "result": "{\"hello\":\"world\"",
  "requestId": "e7979150-44d3-4021-926c-9d9679788eb8"
}
Actions that take longer than 25 seconds to complete will return a response with a pending state. Nevertheless, the action will continue to run in the background and eventually complete (in less than 5 minutes).
If "message":"Missing Authentication Token" is the response to a Webhook HTTP request, double check that the request was actually a POST. This response occurs when issuing a GET.
Webhook requests have strict content-type requirements. If the request does not have a Content-Type: application/json header, the action invocation will return a 415 Unsupported Media Type error. Please make sure to include this header in your requests.
Secrets
Defender secrets allow you to store sensitive information, such as API keys and secrets that can be accessed securely from actions.
Action secrets are key-value case-sensitive pairs of strings, that can be accessed from action code using the event.secrets object. There is no limit to the number of secrets used by an action. Secrets are shared across all actions, and not specific to a single one.
exports.handler = async function(event)
  const { mySecret, anApiKey  = event.secrets;
}
Secrets are encrypted and stored in a secure vault, only decrypted for injection when the action runs. Once written, a secret can only be deleted or overwritten from the user interface, but not read.
An action may log the value of a secret, accidentally leaking it.
While it’s possible to use secrets to store private keys for signing messages or transactions, we recommend to use a Defender relayer instead. Signing operations for Defender relayers provide an extra level of security over loading the private key in action code and signing there.
Key-value data store
The action key-value data store allows to persist simple data across action runs and between different actions. It can be used to store transaction identifiers, hashed user emails, or even small serialized objects.
You can interact with your key-value store through an instance of Defender, which is initialized with the payload injected in the your Action handler function. Once initialized, you can call kvstore.get, kvstore.put, or kvstore.del.
const  Defender  = require('@openzeppelin/defender-sdk');

exports.handler = async function (event)
  const client = new Defender(event);

  await client.keyValueStore.put('myKey', 'myValue');
  const value = await client.keyValueStore.get('myKey');
  await client.keyValueStore.del('myKey');
;
The key-value store allows to get, put, and delete key-value pairs, which must be strings that are limited to 1 KB and values to 300 KB.
Data stored is shared across all actions. To isolate the records managed by each action, prefixing the keys with a namespace unique to each action is recommended.
Each item expires 90 days after its last update. If long-lived data store is needed, we recommend setting up an external database and use action secrets to store the credentials for connecting to it.
Notifications
Actions can send notifications through various channels already defined in the Defender Notifications settings. This integration allows you to quickly inform other connected systems about changes detected or made by actions.
To send a notification, you should use notificationClient.send(), as shown in the following example:
exports.handler = async function(credentials, context)
  const { notificationClient  = context;

  try
    notificationClient.send({
      channelAlias: 'example-email-notification-channel-alias',
      subject: 'Action notification example',
      message: 'This is an example of a email notification sent from an action',
    );
  } catch (error)
    console.error('Failed to send notification', error);

}
For email notifications, basic HTML tags are supported. Here’s an example of how to generate an HTML message:
function generateHtmlMessage(actionName, txHash)
  return `
<h1>Transaction sent from Action ${actionName</h1>
<p>Transaction with hash <i>$txHash</i> was sent.</p>
`;
}

exports.handler = async function(event, context)
  const { notificationClient  = context;

  const relayer = new Relayer(credentials);

  const txRes = await relayer.sendTransaction(
    to: '0xc7464dbcA260A8faF033460622B23467Df5AEA42',
    value: 100,
    speed: 'fast',
    gasLimit: '21000',
  );

  try
    notificationClient.send({
      channelAlias: 'example-email-notification-channel-alias',
      subject: `Transaction sent from Action ${event.actionName`,
      message: generateHtmlMessage(event.actionName, txRes.hash),
    });
  } catch (error)
    console.error('Failed to send notification', error);

}
To send a metric notification, use the notificationClient.sendMetric() method instead, as shown in the following example:
exports.handler = async function(credentials, context)
  const { notificationClient  = context;

  try
    notificationClient.sendMetric({
      channelAlias: 'example-email-notification-channel-alias',
      name: 'datadog-test-metric',
      value: 1,
    );
  } catch (error)
    console.error('Failed to send notification', error);

}
If an invalid or paused notification channelAlias is passed, an error will be thrown.
If a notification cannot be sent for any other reason, no error will be thrown, but a status message will be added to the action logs. For example, if a notification to a webhook channel that has an inactive URL is sent, a log entry will be added but no error will be thrown.
If multiple notification channels are using the same alias, the notification will be sent to all of them.
Error handling
Automatic action invocations that result in an error contain an errorType field in the action run response that will be set to an ActionErrorType as defined in defender-sdk. A user readable error will also appear in the Run History view.
Local development
If you want to reproduce the behavior of an action locally for debugging or testing, follow these steps:
- Initialize a new npm project (
npm init) - Set the
dependencieskey inpackage.jsonto the packages indicated in the Environment section above - Download
yarn.lock: 📎 yarn.lock - Run
yarn install --frozen-lockfile.
You can also use the following template for local development, which will run the action code when invoked using node. It will load the relayer credentials from environment variables, or use the injected credentials when run by Defender.
const  Defender  = require('@openzeppelin/defender-sdk');


// Entrypoint for the action
exports.handler = async function(event)
  const client = new Defender(credentials);
  // Use client.relaySigner for sending txs


// To run locally (this code will not be executed in actions)
if (require.main === module)
  const { RELAYER_API_KEY: apiKey, RELAYER_API_SECRET: apiSecret  = process.env;
  exports.handler( apiKey, apiSecret )
    .then(() => process.exit(0))
    .catch(error =>  console.error(error); process.exit(1); );
}
Remember to send any other value that your action expects in the event object, such as secrets or monitor events.
Updating code
You can edit an action’s code via the Defender interface, or programmatically via API using the defender-sdk npm package. The latter allows to upload a code bundle with more than a single file:
The code bundle must not exceed 5MB in size after being compressed and base64-encoded, and it must always include an index.js at the root of the zip file to act as the entrypoint.
Workflows
Workflows allow you to instantly detect, respond, and resolve threats and attacks with pre-defined actions and scenarios. You can conduct attack simulations and test real-world scenarios on forked networks too.
Workflows are processes that combine automatic actions and transaction templates. Actions can be run in parallel or connected sequentially. Workflows can be triggered manually or via a Monitor.
Creating workflows is a seamless experience guided through a form that allows you to organize actions in the workflow process easily.
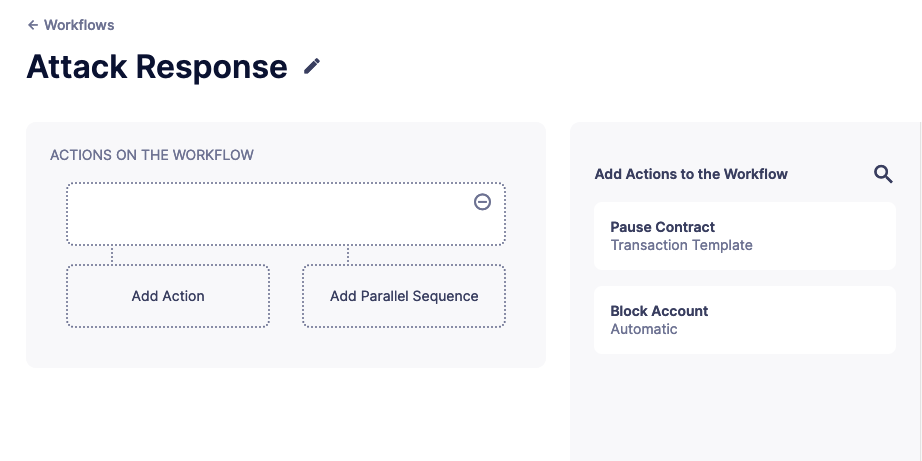
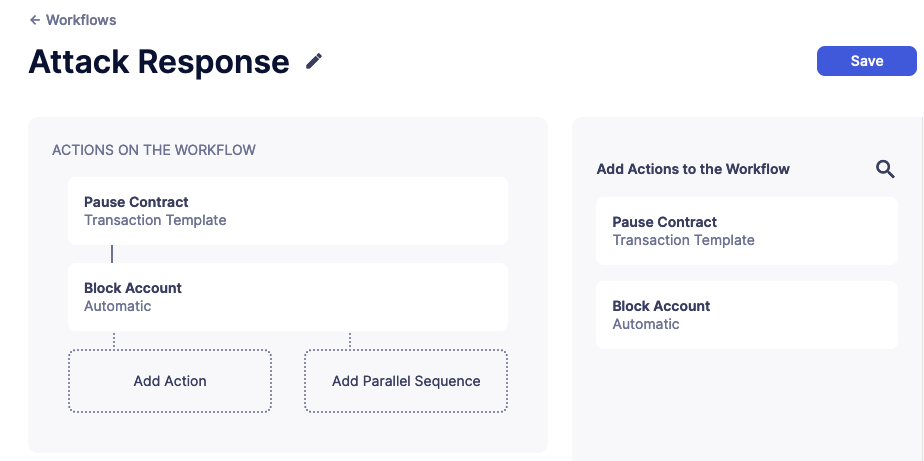
To populate a workflow, you have to drag existing actions from the list on the right onto the form. Actions are executed vertically, meaning the previous actions must finish successfully to begin the execution of the new row. Parallel actions are executed at the same time. However, the workflow stops completely if an action exits with an error.
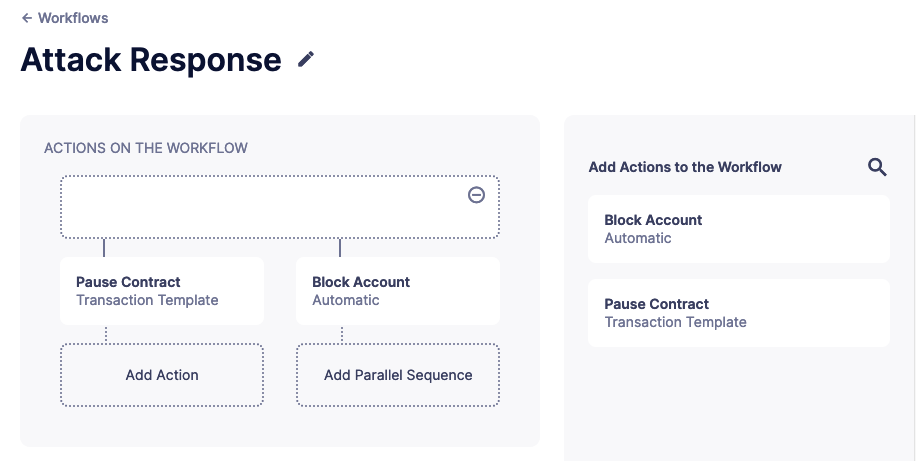
To run multiple actions in parallel, click "Add Parallel Sequence" and drag actions into the available side-by-side boxes.
You can drag actions back off the workflow to remove them or click the visible minus icon in the upper right to remove an empty step. The "Save" button on the top right saves the workflow with its configuration and name.
We provide a quickstart tutorial to create and use Workflows. Check it out here!
A complete example
The following example uses ethers.js and the relayer integration to send a transaction calling execute on a given contract. Before sending the transaction, it checks a canExecute view function and validates if a parameter received via a webhook matches a local secret. If the transaction is sent, it returns the hash in the response, which is sent back to the webhook caller.
const  ethers  = require("ethers");
const  DefenderRelaySigner, DefenderRelayProvider  = require('defender-relay-client/lib/ethers');

// Entrypoint for the action
exports.handler = async function(event)
  // Load value provided in the webhook payload (not available in schedule or sentinel invocations)
  const { value  = event.request.body;

  // Compare it with a local secret
  if (value !== event.secrets.expectedValue) return;

  // Initialize relayer provider and signer
  const provider = new DefenderRelayProvider(event);
  const signer = new DefenderRelaySigner(event, provider,  speed: 'fast' );

  // Create contract instance from the signer and use it to send a tx
  const contract = new ethers.Contract(ADDRESS, ABI, signer);
  if (await contract.canExecute())
    const tx = await contract.execute();
    console.log(`Called execute in ${tx.hash`);
    return  tx: tx.hash ;
  }
}
The code does not need to wait for the transaction to be mined. Defender will take care of monitoring the transaction and resubmitting if needed. The action only needs to send the request and exit.
Security considerations
The code for each action is isolated in Defender, and actions are restricted via strict access controls to have zero access to other Defender internal infrastructure. The only exception is that an action may access its linked relayer, which is negotiated via temporary credentials injected by the action service upon each execution. Still, the action can only call the relayer’s exposed methods and has no direct access to the backing private key or any other services.
We provide a quickstart tutorial to create an automatic action for a smart contract using Defender. Check it out here!