Securely deploy and upgrade a smart contract
Defender allows you to easily deploy and upgrade smart contracts across chains while maintaining the best security practices. This tutorial shows how to use a Relayer to deploy a contract called Box and upgrade it with the UUPS proxy pattern via a Safe wallet (multisig).
Pre-requisites
- OpenZeppelin Defender account.
- NodeJS and NPM
- Any IDE or text editor
- Web browser with Metamask (or any other compatible wallet), funded with Sepolia ETH.
1. Configure
Safe wallet
First, you need to create Safe wallet to manage the upgrade process. To do so, follow these steps:
-
Open the Safe app in a web browser and connect your wallet (make sure you are connected to the Sepolia testnet).
-
Click on Create new Account and follow the steps.
-
Note the address of the Safe wallet you created, you will need it later.
Environment setup
Now, you will create a Defender test environment with the Sepolia testnet, where you will deploy and upgrade the smart contracts. To do so, follow these steps:
-
Open Defender Deploy.
-
Click on Setup.
-
Pick Sepolia from the dropdown.
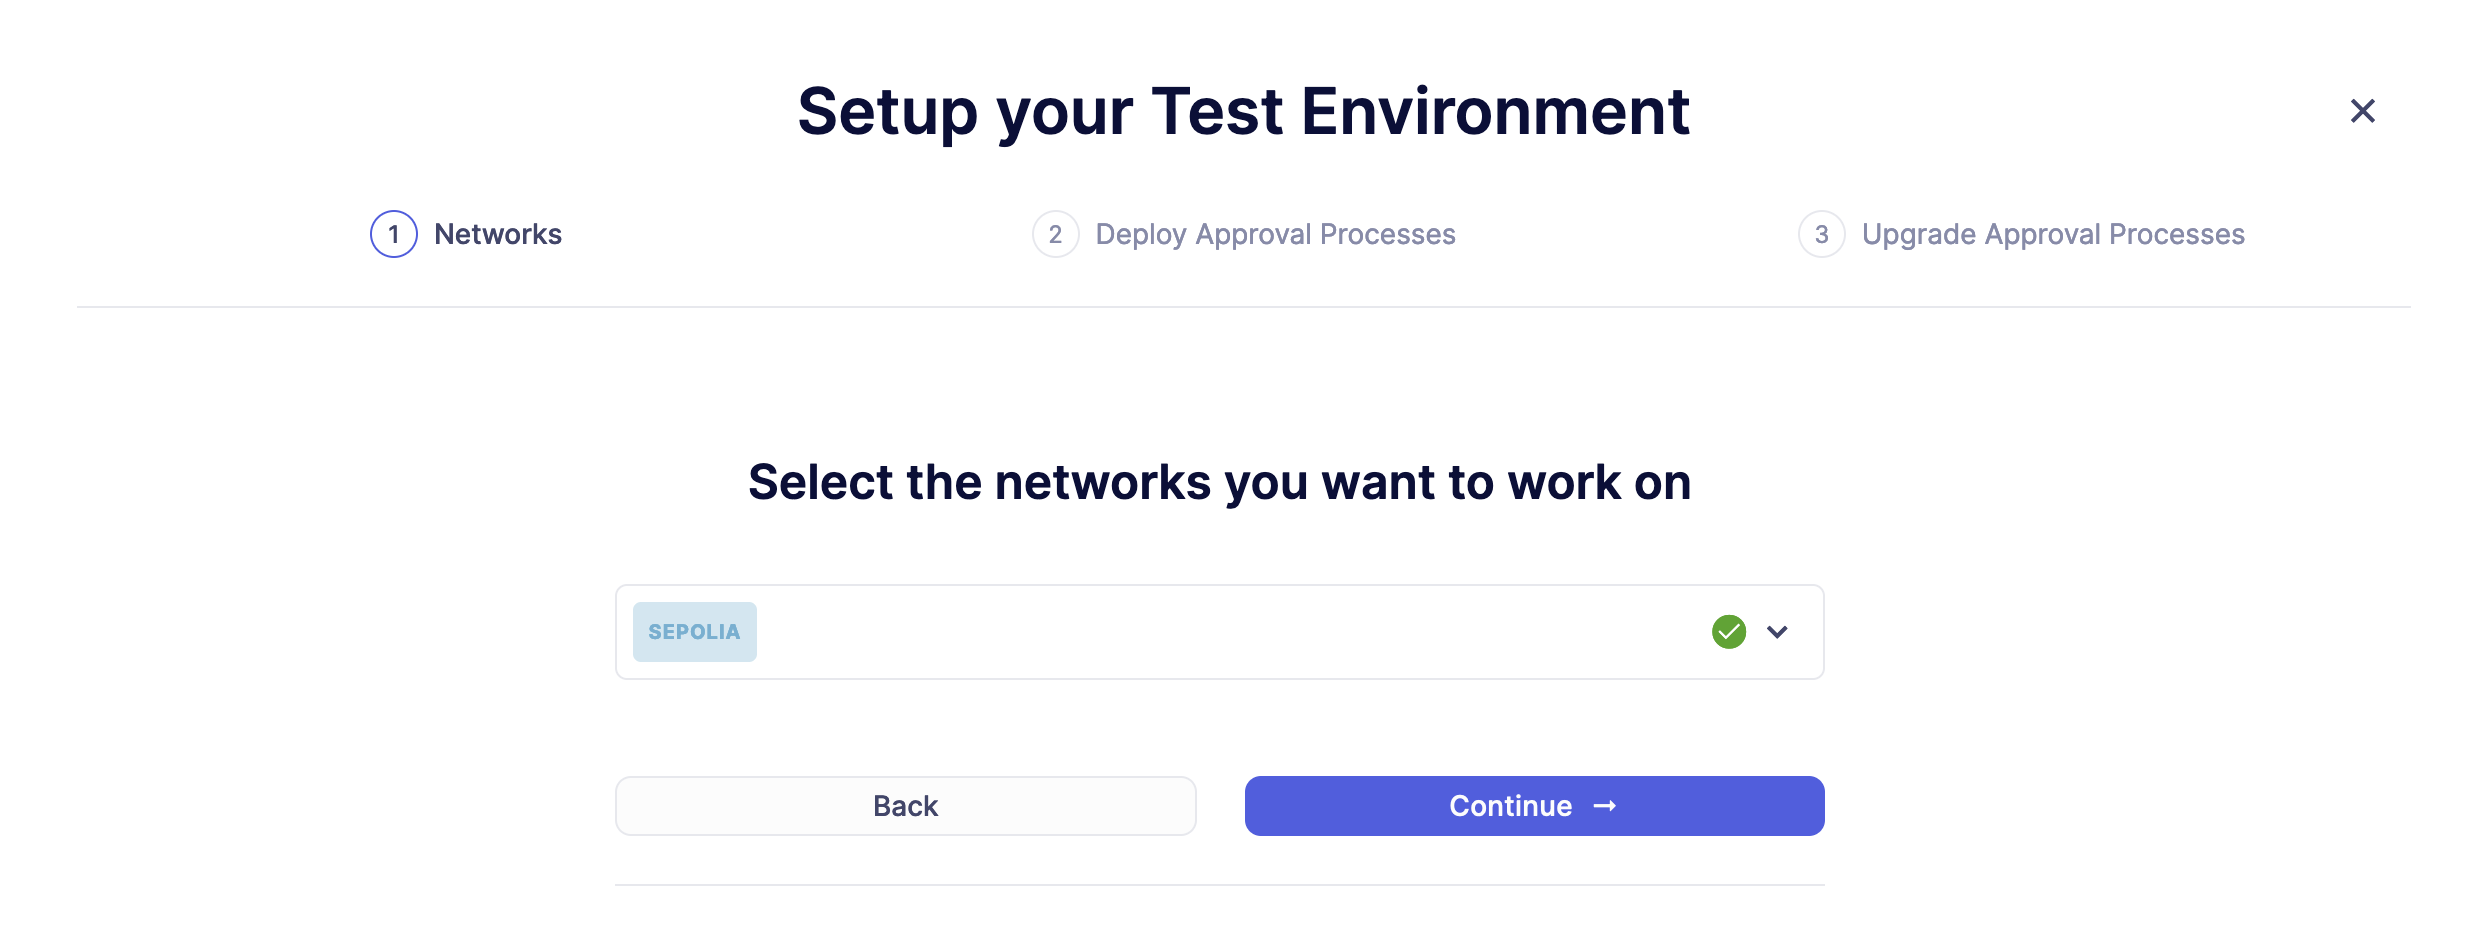
-
Select the approval process associated with your funded relayer that will execute the deployments for the test environment. In case you don’t already have an approval process, Defender will allow you to create one within the wizard flow. Relayers automate the payment of gas fees and take care of private key secure storage, transaction signing, nonce management, gas pricing estimation, and resubmissions. However, you may also choose to deploy using an EOA ("Externally Owned Account") or Safe wallet.
Read more about relayers and how to manage them here.
image::tutorial-deploy-step2-wizard.png[Deploy block deploy wizard]
- Click on the Approval Process field to expand the dropdown and click on Create an Approval Process. Enter "Safe Wallet Approval Process" as the name and expand the contract field to click on Add contract. Enter "Safe Wallet" as the name, paste the address of your Safe wallet you copied before and click on Create. Select "Safe Wallet" in the contract dropdown and click on Continue.
image::tutorial-deploy-step3-wizard.png[Deploy block upgrade wizard]
- Defender will generate an API Key and Secret for this environment, so copy and store them safely. Click on Let’s Deploy to visit the environment page.
image::tutorial-deploy-step4-wizard.png[Deploy block end wizard]
You configured the test environment to learn without the risk of losing actual funds. The steps are the same to set up a production environment.
Defender supports both Hardhat and Foundry integrations. Pick the one that suits your project!
Foundry setup
First, make sure you have Foundry installed. Follow these steps to create a new directory and project:
-
Run the this command in your terminal:
forge init deploy-tutorial && cd deploy-tutorial && forge install foundry-rs/forge-std && forge install OpenZeppelin/openzeppelin-foundry-upgrades && forge install OpenZeppelin/openzeppelin-contracts-upgradeable -
Now, configure the
foundry.tomlfile to enable ffi, ast, build info and storage layout:[profile.default] ffi = true ast = true build_info = true extra_output = ["storageLayout"] -
Create a new file called
.envin the project root directory and add the following content with the keys you received after creating the Defender environment:DEFENDER_KEY = "<<YOUR_KEY>>" DEFENDER_SECRET = "<<YOUR_SECRET>>"
Hardhat setup
First, make sure you have Hardhat installed with ethers v6. Follow these steps to create a new directory and project:
-
Run the this command in your terminal:
mkdir deploy-tutorial && cd deploy-tutorial && npx hardhat init -
Hardhat will ask some questions to setup the configuration, so answer the following:
-
- What do you want to do: Create a Typescript project
- Hardhat project root: Leave it as it is
- Do you want to use .gitignore: Yes
- Do you want to install this sample project’s dependencies with npm: Yes
-
Hardhat will now install the tooling libraries, and create the project files for you. Afterwards, install the OpenZeppelin packages with the following command:
npm i @openzeppelin/hardhat-upgrades @openzeppelin/contracts-upgradeable dotenv --save-dev
Once everything has been installed, your initial directory structure should look something like this:
image::tutorial-deploy-directory.png[Deploy directory structure,185,300]
-
You now need to edit your Hardhat configuration to add the Defender keys and Sepolia network. Open the
hardhat.config.tsfile, and replace its content with the following code:import HardhatUserConfig from "hardhat/config"; import "@nomicfoundation/hardhat-toolbox"; import "@openzeppelin/hardhat-upgrades"; require("dotenv").config(); const config: HardhatUserConfig = solidity: "0.8.20", defender: { apiKey: process.env.DEFENDER_KEY as string, apiSecret: process.env.DEFENDER_SECRET as string, , networks: sepolia: { url: "https://ethereum-sepolia.publicnode.com", chainId: 11155111 , }, }; export default config; -
Create a new file called
.envin the project root directory and add the following content with the keys you received after creating the Defender environment:DEFENDER_KEY = "<<YOUR_KEY>>" DEFENDER_SECRET = "<<YOUR_SECRET>>"
2. Deploy
-
Create a new file called
Box.solinside thecontractsorsrcdirectory and add the following code:// SPDX-License-Identifier: Unlicense pragma solidity ^0.8.20; import Initializable from "@openzeppelin/contracts-upgradeable/proxy/utils/Initializable.sol"; import UUPSUpgradeable from "@openzeppelin/contracts-upgradeable/proxy/utils/UUPSUpgradeable.sol"; import OwnableUpgradeable from "@openzeppelin/contracts-upgradeable/access/OwnableUpgradeable.sol"; /// @title Box /// @notice A box with objects inside. contract Box is Initializable, UUPSUpgradeable, OwnableUpgradeable /*////////////////////////////////////////////////////////////// VARIABLES //////////////////////////////////////////////////////////////*/ /// @notice Number of objects inside the box. uint256 public numberOfObjects; /*////////////////////////////////////////////////////////////// FUNCTIONS //////////////////////////////////////////////////////////////*/ /// @notice No constructor in upgradable contracts, so initialized with this function. function initialize(uint256 objects, address multisig) public initializer { __UUPSUpgradeable_init(); __Ownable_init(multisig); numberOfObjects = objects; /// @notice Remove an object from the box. function removeObject() external require(numberOfObjects > 1, "Nothing inside"); numberOfObjects -= 1; /// @dev Upgrades the implementation of the proxy to new address. function _authorizeUpgrade(address) internal override onlyOwner {} }This is a contract that replicates a box, with three functions:
initialize(): Initializes the upgradeable proxy with its initial implementation and sets the multisig as the owner.removeObject(): Decreases the number of objects in the box by removing one._authorizeUpgrade(): Points the proxy to a new implementation address.
Foundry
-
Create a file named
Deploy.s.solinside thescriptdirectory. This script will deploy the upgradeable Box contract through Defender with an initial amount of 5 objects inside and the owner as the multisig address configured in the environment setup. Theinitializeroption is used to call theinitialize()function after the contract is deployed. Copy and paste the code below intoDeploy.s.sol:// SPDX-License-Identifier: Unlicense pragma solidity ^0.8.20; import Script from "forge-std/Script.sol"; import console from "forge-std/console.sol"; import Defender, ApprovalProcessResponse from "openzeppelin-foundry-upgrades/Defender.sol"; import Upgrades, Options from "openzeppelin-foundry-upgrades/Upgrades.sol"; import Box from "src/Box.sol"; contract DefenderScript is Script function setUp() public { function run() public ApprovalProcessResponse memory upgradeApprovalProcess = Defender.getUpgradeApprovalProcess(); if (upgradeApprovalProcess.via == address(0)) { revert( string.concat( "Upgrade approval process with id ", upgradeApprovalProcess.approvalProcessId, " has no assigned address" ) ); Options memory opts; opts.defender.useDefenderDeploy = true; address proxy = Upgrades.deployUUPSProxy("Box.sol", abi.encodeCall(Box.initialize, (5, upgradeApprovalProcess.via)), opts); console.log("Deployed proxy to address", proxy); } } -
Deploy by running the following command which executes your deployment script:
forge script script/Deploy.s.sol --force --rpc-url https://ethereum-sepolia.publicnode.com
Hardhat
-
Open the file
deploy.tsinside thescriptsdirectory. This script will deploy the upgradeable Box contract through Defender with an initial amount of 5 objects inside and the owner as the multisig address configured in the environment setup. Theinitializeroption is used to call theinitialize()function after the contract is deployed. Copy and paste the code below intodeploy.ts:import ethers, defender from "hardhat"; async function main() const Box = await ethers.getContractFactory("Box"); const upgradeApprovalProcess = await defender.getUpgradeApprovalProcess(); if (upgradeApprovalProcess.address === undefined) { throw new Error(`Upgrade approval process with id ${upgradeApprovalProcess.approvalProcessId has no assigned address`); } const deployment = await defender.deployProxy(Box, [5, upgradeApprovalProcess.address], initializer: "initialize" ); await deployment.waitForDeployment(); console.log(`Contract deployed to $await deployment.getAddress()`); } // We recommend this pattern to be able to use async/await everywhere // and properly handle errors. main().catch((error) => console.error(error); process.exitCode = 1; );You should use
deployProxy(),deployBeacon()anddeployImplementation()for upgradeable contracts, anddeployContract()for non-upgradeable contracts. To forcefully usedeployContract(), set theunsafeAllowDeployContractoption totrue. More information here. -
Deploy your box by running the following command which executes your deployment script:
npx hardhat run --network sepolia scripts/deploy.ts
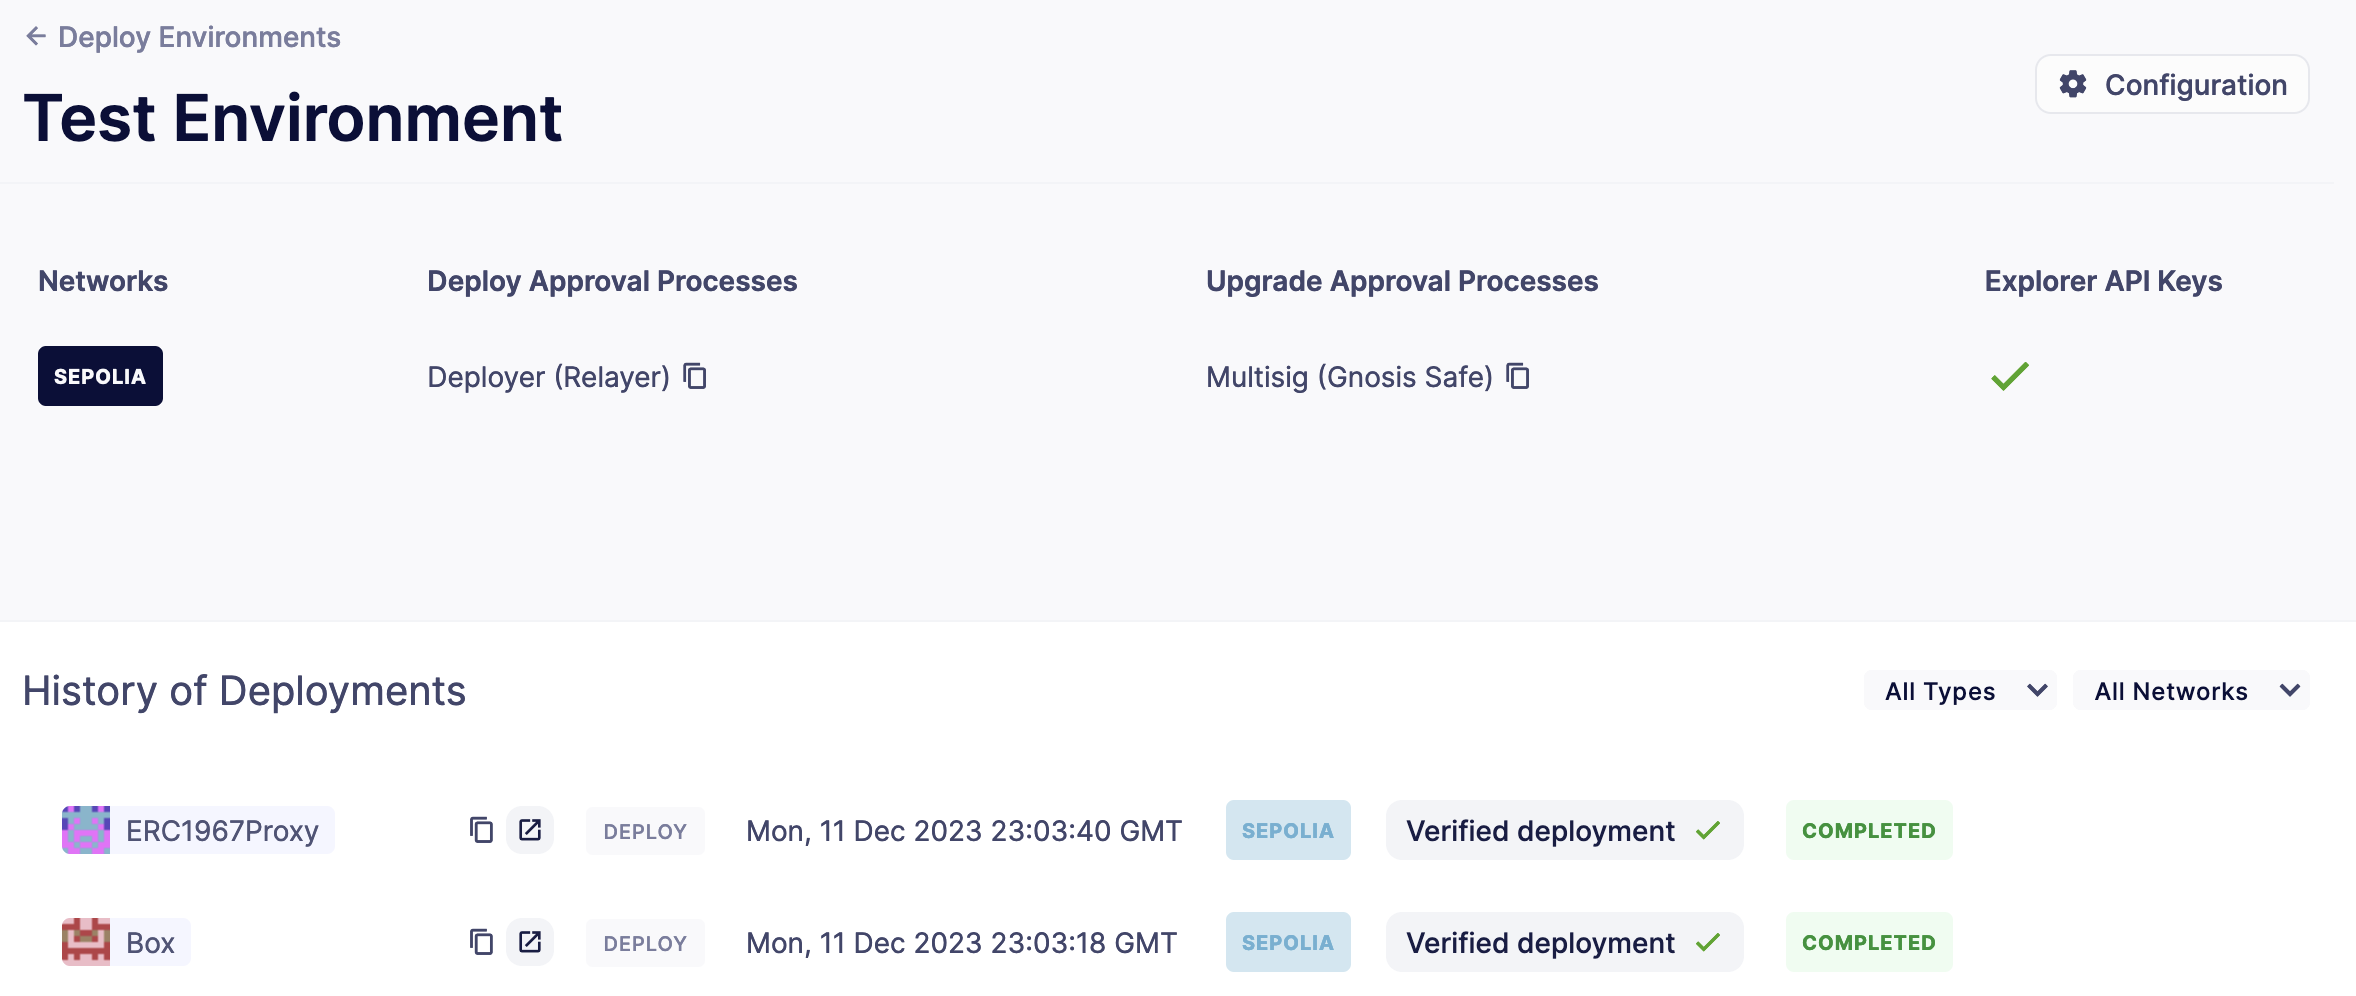
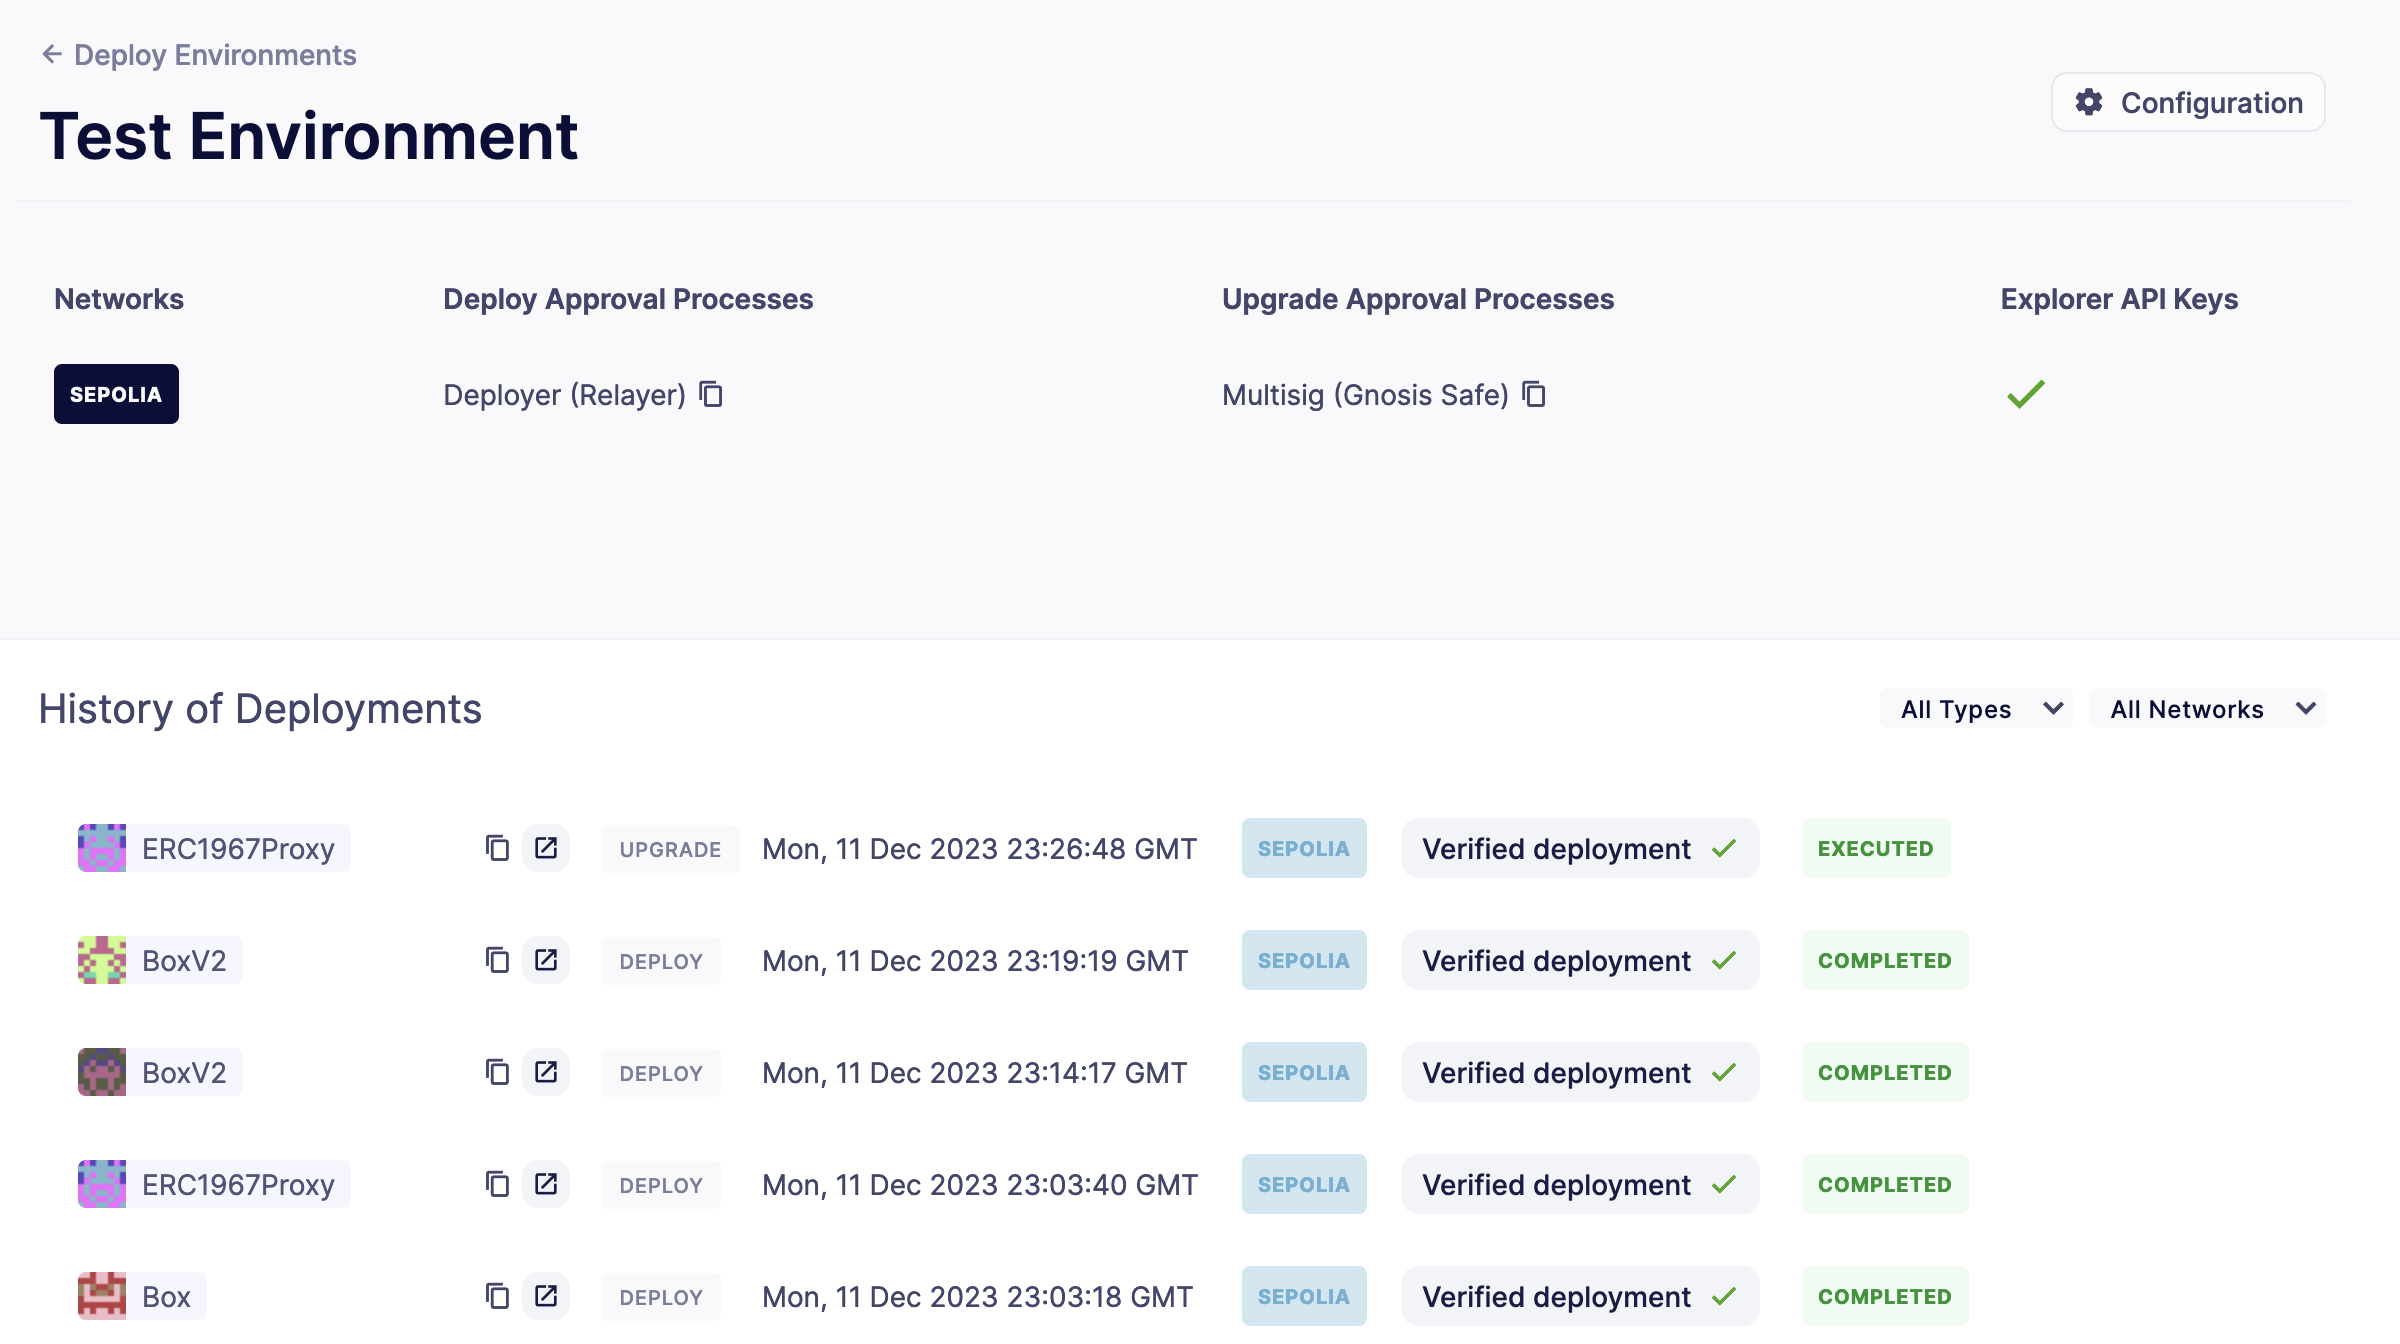
Success! Your contracts should have been deployed in the Sepolia testnet. Navigate to Deploy in Defender and check that the proxy and implementation have been deployed inside the test environment. All Box transactions should be sent to the proxy address as it will store the state and point to the given implementation. Copy the address of the proxy to upgrade it next.
Caveats
By default, Defender utilizes the CREATE opcode to deploy contracts. This method creates a new contract instance and assigns it a unique address. This address is determined by the transaction’s nonce and sender’s address.
Defender also offers an advanced deployment option using the CREATE2 opcode. When a deployment request includes a salt, Defender switches to using the CREATE2 opcode. This opcode allows you to deploy contracts to a deterministic address based on a combination of the sender’s address, salt, and contract bytecode.
While CREATE2 offers deterministic contract addresses, it alters msg.sender behavior. In CREATE2 deployments, msg.sender in the constructor or initialization code refers to the factory address, not the deploying address as in standard CREATE deployments. This distinction can impact contract logic, so careful testing and consideration are advised when opting for CREATE2
3. Upgrade
Upgrading a smart contract allows changing its logic while maintaining the same address and storage.
-
Create a file called
BoxV2.solinside thecontractsorsrcdirectory and add the following code:// SPDX-License-Identifier: Unlicense pragma solidity ^0.8.20; import Box from "./Box.sol"; /// @title BoxV2 /// @notice An improved box with objects inside. /// @custom:oz-upgrades-from Box contract BoxV2 is Box /*////////////////////////////////////////////////////////////// FUNCTIONS //////////////////////////////////////////////////////////////*/ /// @notice Add an object to the box. function addObject() external { numberOfObjects += 1; /// @notice Returns the box version. function boxVersion() external pure returns (uint256) return 2; }This is a contract adds two new functions to your box:
addObject(): Increases the number of objects in the box by adding one.boxVersion(): Returns the version of the box implementation.
Foundry
-
Create a file called
Upgrade.s.solinside thescriptdirectory and paste the following code. Make sure to replace the<PROXY ADDRESS>with the address of the proxy you copied before.// SPDX-License-Identifier: Unlicense pragma solidity ^0.8.20; import Script from "forge-std/Script.sol"; import console from "forge-std/console.sol"; import ProposeUpgradeResponse, Defender, Options from "openzeppelin-foundry-upgrades/Defender.sol"; contract DefenderScript is Script function setUp() public { function run() public Options memory opts; ProposeUpgradeResponse memory response = Defender.proposeUpgrade( <PROXY ADDRESS>, "BoxV2.sol", opts ); console.log("Proposal id", response.proposalId); console.log("Url", response.url); } -
Create the upgrade proposal using the upgrade script with the the following command:
forge script script/Upgrade.s.sol --force --rpc-url https://ethereum-sepolia.publicnode.com
Hardhat
-
Create a file called
upgrade.tsinside thescriptsdirectory and paste the following code. Make sure to replace the<PROXY ADDRESS>with the address of the proxy you copied before.import ethers, defender from "hardhat"; async function main() const BoxV2 = await ethers.getContractFactory("BoxV2"); const proposal = await defender.proposeUpgradeWithApproval('<PROXY ADDRESS>', BoxV2); console.log(`Upgrade proposed with URL: ${proposal.url`); } // We recommend this pattern to be able to use async/await everywhere // and properly handle errors. main().catch((error) => console.error(error); process.exitCode = 1; ); -
Create the upgrade proposal using the upgrade script with the the following command:
npx hardhat run --network sepolia scripts/upgrade.ts
Approve
- Navigate to the Defender test environment and click on the upgrade proposal, which expands a modal on the right side of the screen.
- Click on View Transaction Proposal and click on Approve and Execute on the top right corner of the page. Sign and execute the transaction with your wallet that you used to create the Safe Wallet.
Your box should now be upgraded to the new version! The upgrade proposal in your test environment page shold now be marked as Executed.
Next steps
Congratulations! You can now deploy and upgrade other contracts using the same environment. In case you are interested in advanced use cases, we are working on deploy-related guides.
After deploying a contract, we recommended using Defender to monitor its state and transactions. Learn how to use Monitor here.