Running a Keep3r Network keeper
This guide will walk you through the process of running a Keeper in the Keep3r Network by leveraging Defender Relay and Autotasks.
| The Keep3r Network project is in beta. Use at your own risk. |
What is a Keeper?
In the context of the Keep3r Network, Keepers are participants who execute available jobs in exchange for a reward. A contract may register a job to be executed, and once it’s available, a registered Keeper can send a transaction to execute it.
A Keeper is the term used to refer to an external person and/or team that executes a job. This can be as simplistic as calling a transaction, or as complex as requiring extensive off-chain logic. The scope of Keep3r network is not to manage these jobs themselves, but to allow contracts to register as jobs for keepers, and keepers to register themselves as available to perform jobs. It is up to the individual keeper to set up their devops and infrastructure and create their own rules based on what transactions they deem profitable.
Prerequisites
To get started, you’ll need the following:
-
A Defender mainnet account. Head over to Defender to sign up for a new account, and then apply for mainnet access indicating that you are interested in running a Keeper. We’ll contact you shortly to activate your account for mainnet access.
-
ETH to pay for transactions gas. Keeper transactions require gas for execution, so make sure to have some ETH available to fund your Relay.
-
KP3R tokens to bond (optional). When you register your Keeper, you may choose to bond a certain amount of KP3R tokens. This affects the rewards you get when working Jobs. Note that you can still run a Keeper without bonding any tokens.
Creating a Relayer
The first step will be to create a Defender Relayer to act as your Keeper. This Relayer will be the Ethereum account you will be executing jobs from.
| You do not need to register as a Keeper manually in keep3r.network, doing so will register your wallet as a Keeper, not your Relayer. |
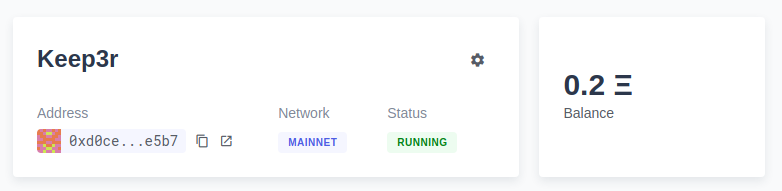
To create a Relayer, simple head over to the Relay section in Defender, and create a new relayer on the Mainnet network. Once created, take note of the Relayer address; you will not need the generated API key and secret for this guide.

| If the option to create the relayer in mainnet is locked, it means your Defender account does not have mainnet access yet. Make sure to apply for mainnet access first and wait for our response. |
Fund your Relayer
Next step is to send ETH to your Relayer, so it has funds to execute the jobs. Copy the Ethereum address of your new Relayer, and use your favorite wallet to send ETH to it. You can send whatever amount you want, but you want at least around 0.2 ETH to be able to send a handful of transactions before running out.
After the transaction is confirmed, you should see the the funds you have transferred in the Relayer’s balance.
| Defender will send you an email when your Relay’s funds drop below 0.1 ETH to remind you to refill it. |
If you want to bond any KP3R tokens to your Relayer, you will need to transfer the tokens to the Relayer address as well. Make sure to send the tokens to the Relayer address and not to the KP3R token contract!
Bond your Relayer
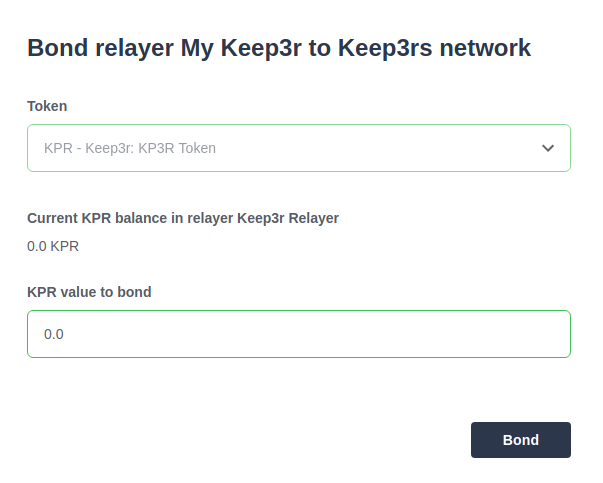
To get your Relayer registered as a Keeper, the first step is to bond it. Click on the gear icon in your Relayer settings page, and choose to Bond to Keep3r Network.
If you want to bond KP3R tokens, now is the time to choose how many you want to bond.
| You can work with zero bonded KP3R tokens, and you can bond more tokens later if you want to do so. |
After the transaction to bond your Relayer is sent, your Relayer will now enter a 3-day waiting period before it can be manually activated as a Keeper. You can access your Relayer page at any time to check how much time is remaining.
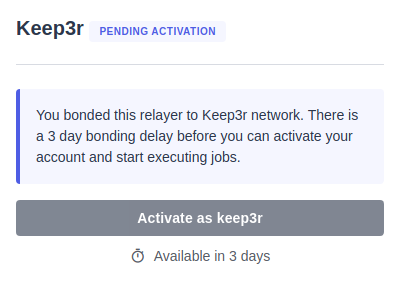
Once the waiting period is over, you can then manually activate your Relayer.
| You can at any time choose to Bond to Keep3r Network again. This will allow you to bond additional KP3R tokens, but will reset the waiting period back to 3 days and then you will need to manually activate as a Keeper. |
Activate your Relayer
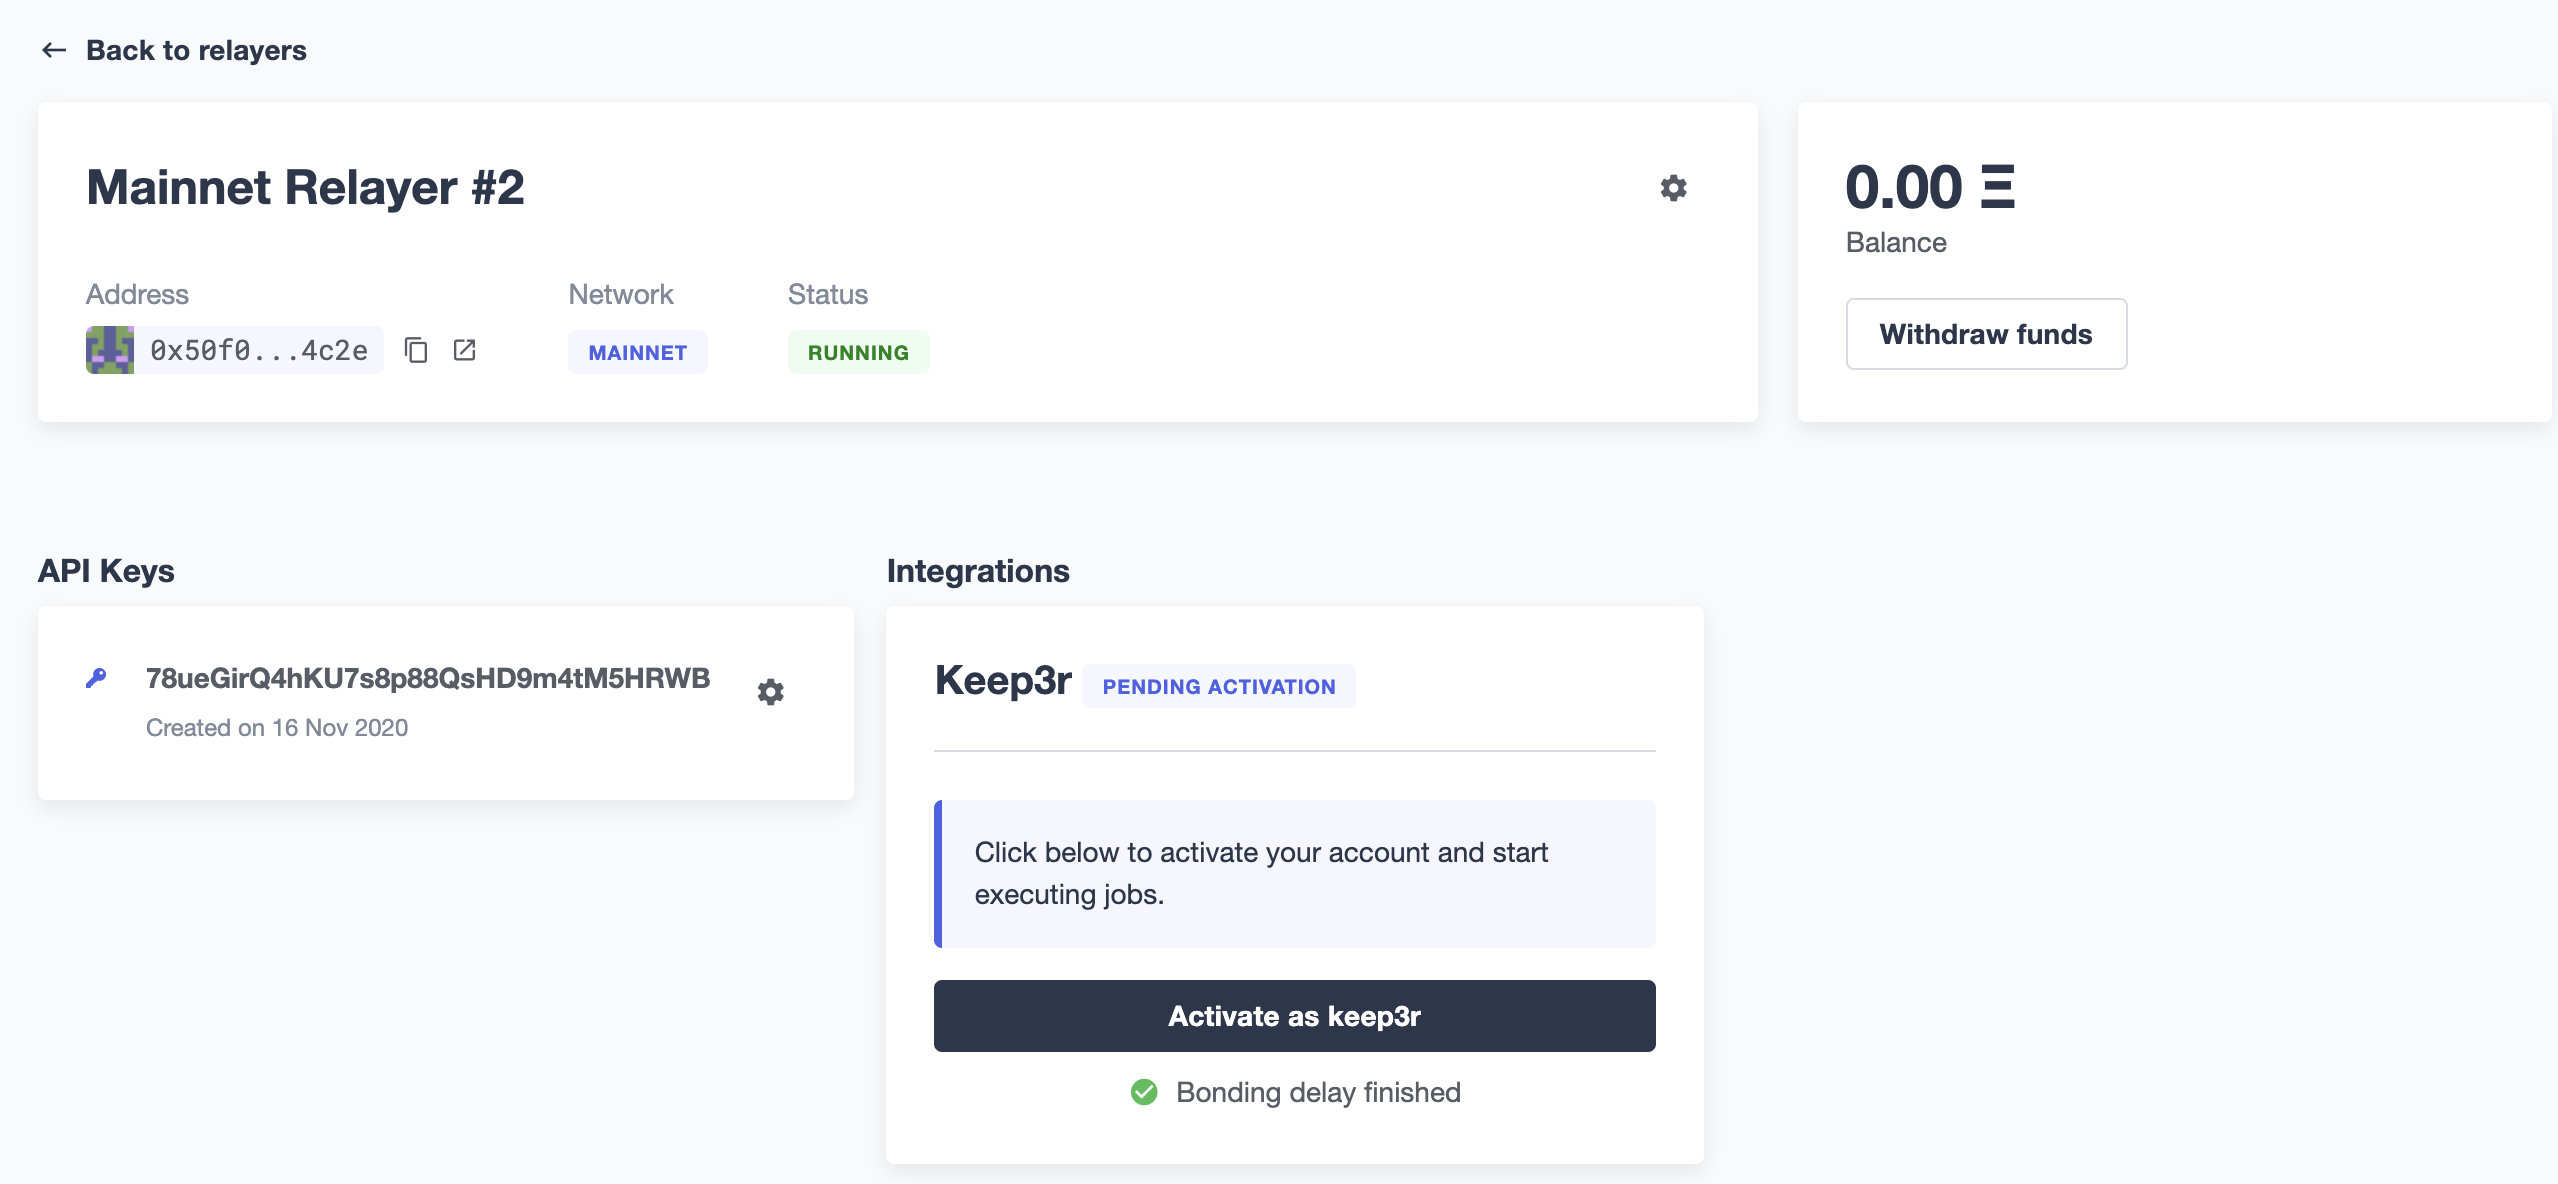
After the 3-day waiting period is over, you will have the option to manually Activate as keep3r.
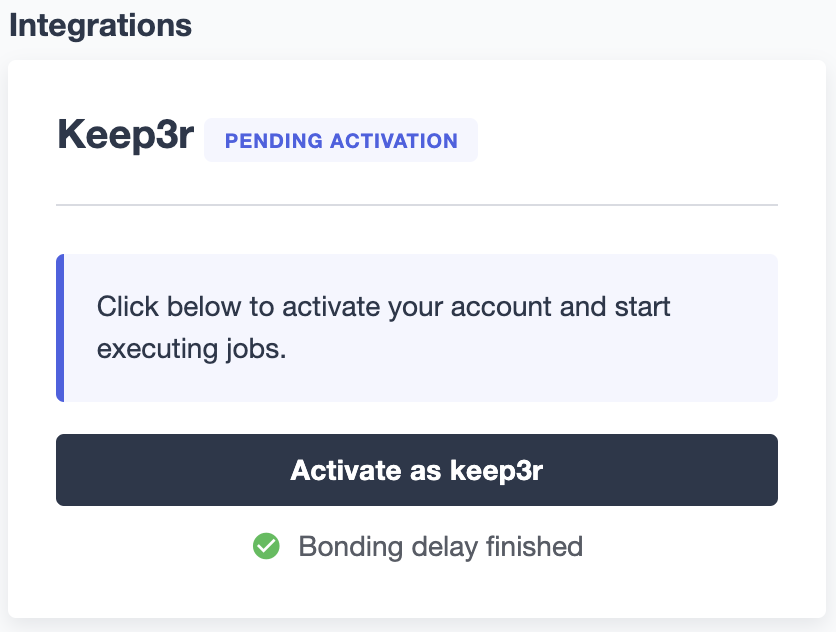
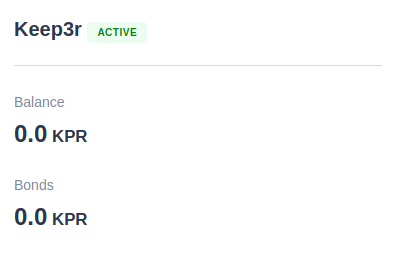
Doing so will send a transaction to activate your Relayer as a Keeper in the network and the status will change to Active.
Create an Autotask
Now that you have your Relayer active as a Keeper, let’s set up the Defender Autotask that will instruct your Relayer to send them. An Autotask is a snippet of code that runs at regular intervals, in this case, we’ll use it to automate the process of bonding, activating, searching for jobs, and executing them.
Create a new Autotask in the Autotasks section of Defender, choosing to run every one minute, and connecting it to the Relayer you had created previously.
As for the code, paste this code snippet from the defender-autotask-examples repository, which will attempt to work the YearnV1EarnKeep3r, HegicPoolKeep3r, and UniswapV2SlidingOracle contracts. Once you hit save, Defender will start executing the Autotask every minute.
If you are familiar with javascript, you can edit your Autotask code at any time to add new jobs as they are published. To do this, add the ABI of the contract you want to work to the ABIs object in the snippet, and add an entry to Jobs with the contract name and address, as well as the names of the workable and work functions.
|
Fine Tuning
Defender will automatically pick the gas price for your transactions based on the current network prices. You can tune how aggressive do you want to be with gas prices by changing the speed parameter in the script between safeLow, average, fast, or fastest. Higher gas price means you will have a better chance of scoring a job if there are multiple Keepers competing for it, but also that your transaction will be more expensive!
Alternatively, you can also set a gas price yourself if you want to have maximum control over your transactions. Instead of setting a speed, just set a gasPrice or maxFeePerGas/maxPriorityFeePerGas for your transaction, and Defender will honor that value. You can rely on this to try to outbid all other Keepers running on Defender, but bear in mind the costs in gas fees.
Executing Jobs
The autotask you have set up will automatically start looking for available jobs in the YearnV1EarnKeep3r, HegicPoolKeep3r, and UniswapV2SlidingOracle contracts. You can check out your Autotask logs to see what your Keeper has done on each run, and monitor your rewards on the Relayer page.
| Keep in mind that sending the transaction does not automatically mean you will get rewarded for it: other Keepers may also be monitoring the job for work, and if their transaction gets mined before yours, you will not get the reward! And what’s worse: reverted transactions also pay gas! |
Collecting your Rewards
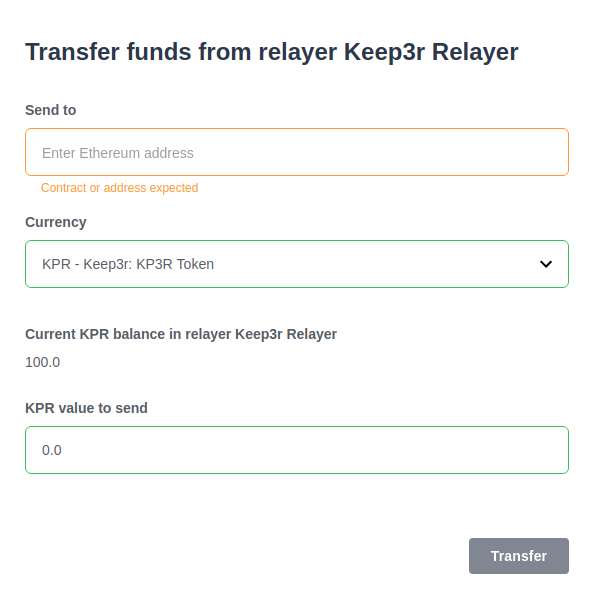
After working some jobs, you can send your earned KP3R tokens from your Relayer back to your wallet. To do so, go to your Relayer page and choose to Withdraw funds. Enter your wallet address, choose KPR as currency, and input the amount of tokens you want to withdraw. Make sure you enter your wallet address correctly, or you may irretrievably lose your tokens!
| You can also use the Withdraw funds option to send ETH from your Relayer back to your wallet at any time. |
Leaving the Keeper network
In the event that you no longer wish to participate as a Keeper, you can just stop your Autotask to stop executing Jobs, and withdraw your KP3R and ETH from your Relayer. If you hadn’t bonded any tokens during the registration phase, this is enough.
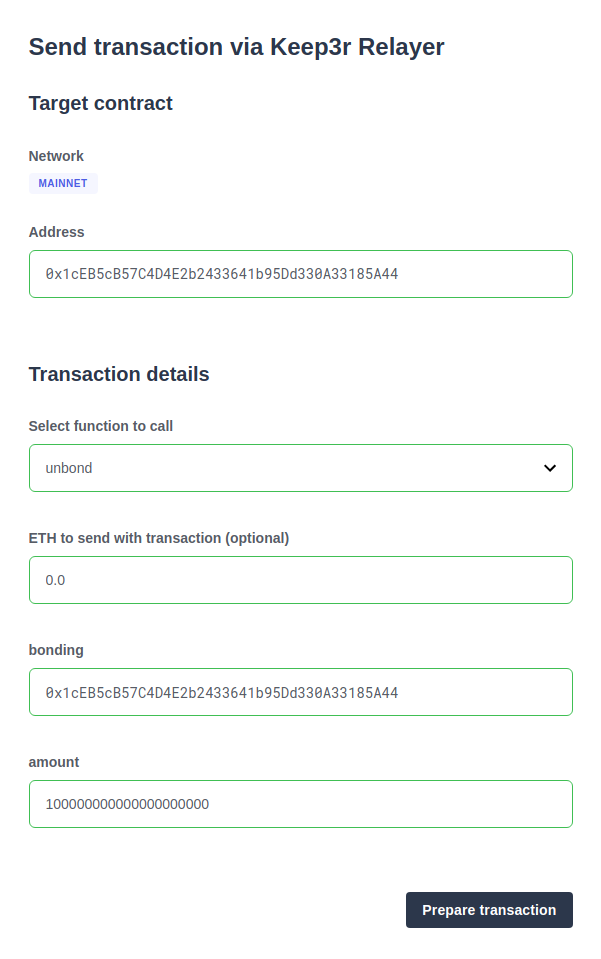
If you did bond tokens during registration, and you want to retrieve, you will need to unregister as a Keeper. To do this, start by choosing to Send a transaction in your Relayer page, enter the Keeper contract address 0x1cEB5cB57C4D4E2b2433641b95Dd330A33185A44, and choose the unbond function. The bonding parameter corresponds to the address of the token you had bonded (again 0x1cEB5cB57C4D4E2b2433641b95Dd330A33185A44 for KP3R), and amount is the number of tokens you want to unbond (including the extra decimals as zeros, so 100 KP3R should be entered as 100000000000000000000).
After this transaction is sent, you will have to wait a 14-day unbonding period. Once passed, you will need to send another transaction from your Relayer, this time calling the withdraw function instead, with the same bonding parameter as before. This will effectively remove your Relayer as a Keeper, and send your bonded tokens back to your Relayer address, from where you can Withdraw them to your wallet.
Questions
If you have any questions or comments, don’t hesitate to ask on the forum!