Relay
The Defender Relay service allows you to send transactions via a regular HTTP API, and takes care of private key secure storage, transaction signing, nonce management, gas pricing estimation, and resubmissions. This way you don’t need to worry about securing your private keys in your backend scripts, or by monitoring your transactions to ensure they get mined.
Use cases
Use a Defender Relayer every time you find yourself using a hot wallet in your code. Whenever you need to send a transaction from a script or your backend, you can connect to a Relayer instead to simplify key management and transaction submissions.
-
Poking your contracts to trigger a state transition
-
Update an on-chain oracle with external data
-
Sending meta-transactions to build a gasless experience
-
React to sign-ups in your app by airdropping tokens to your new users
-
Sweeping funds from protocol contracts to secure wallets
-
Building bots for interacting with smart contract protocols
What’s in a Relayer?
Each Defender Relayer is an Ethereum account assigned exclusively to your team. Every time you create a new Relayer, Defender will create a new private key in a secure vault. Whenever you request Defender to send a transaction through that Relayer, the corresponding private key will be used for signing.
You can think of each Relayer as a queue for sending transactions, where all transactions sent through the same Relayer will be sent in order and from the same Ethereum account, controlled exclusively by your team. Skip ahead to the Under the hood section if you want more info on how Relayers work behind the scenes!
| Keep in mind that you’ll need to fund each Relayer individually with ETH to ensure they have enough funds to pay for the gas of the transactions you send. Defender will send you an email notification if a Relayer’s funds drop below 0.1 ETH. |
| Defender Relayers are implemented as Externally Owned Accounts. We are working to implement Smart Accounts in the future as well, to support batched transactions, gas tokens, and cold keys for on-chain management. |
API Keys
Each Relayer can have one or more API keys associated with it. In order to send a transaction through a Relayer, you will need to authenticate the request with one an API key/secret pair. You can create or delete API keys as you see fit, and this will not change the sending address or Relayer balance.
| The API key of a relayer is not related to its private key. The private key is always kept within a secure key vault and never exposed (see the Security considerations section for more info). This decoupling allows you to freely rotate API keys while keeping the same Ethereum address for your relayer. |
| When creating a new API key, keep in mind that the API secret is only visible once during the creation — if you don’t write it down, it’s lost forever. Luckily, creating a new API key is as easy as clicking a button. |
Pausing
You can pause a Relayer from the Defender website, to quickly respond to an emergency. This will cause the Relayer to reject any incoming requests to send a transaction, whether it is from an Autotask or via the API. However, keep in mind that any transactions already sent will not be cancelled. When you are ready to resume operations, just hit the Unpause button and your Relayer will go back to normal.
Addresses
Whenever you create a Relayer, a fresh Ethereum account will be created to back it. For security reasons, it is not possible to import an existing private key into a Relayer, not export the private key of a Relayer created by Defender. To avoid platform lock-in, if you grant a privileged role to a Relayer address in your system, consider having an administrative method for switching it to a different one if needed.
You can choose to reuse the same address of one of your existing relayers for a different one on another network. This allows you to have the same addresses on different networks in a multi-chain system. To do this, choose to Clone a relayer in the settings menu of a relayer, and then choose the network for the new relayer that should have the same address. Note that it is not possible to have more than one relayer with the same address per network.
Policies
You can limit a Relayer’s behavior by specifying policies.
To configure your Relayer’s policies, go to your Relayer settings page, click the cog icon button, Manage policies. You will then see a form where you can opt to enable policies and tweak their parameters.
Currently, these are the different opt-in policies:
Gas price cap
Specify a maximum gas price for every transaction sent by the Relayer. When this policy is enabled, Defender will overwrite the gasPrice or maxFeePerGas of any transaction that goes beyond the specified cap. Take into account that the gas price for a transaction is specified based on gas price oracles at the moment the Relayer actually sends the transaction to be mined, so this policy can be used as a protection on gas price surges.
| In addition to the maximum gas price policy you can specify here, Defender implements a minimum gas price policy of 30 Gwei to transactions sent to the Polygon network. You can read more about Polygon’s decision to establish a minimum gas price here. |
Receiver whitelist
Specify a list of authorized recipients for every transaction sent by the Relayer. Defender will reject and discard any transaction whose recipient address is not in the list.
The receiver whitelist applies only to the to field of a transaction. It doesn’t filter ERC20 or other assets receivers.
|
EIP1559 Pricing
Specify if the transactions the Relayer is sending should be EIP1559 by default or not. This applies whenever the Relayer sends a transaction with the speed parameter, or a non specified gasPrice or maxFeePerGas/maxPriorityFeePerGas. Note that this is only shown for EIP1559 compatible networks.
| EIP1559 Pricing policy is enabled by default for new relayers. If you have a Relayer that was created without the default opt-in, you can always enable this flag. |
Private transactions
Specify if the transactions should be sent via private mempoool. This means that a transaction will not be publicly seen until it’s included in a block.
| Private transactions are only enabled for mainnet by using the Flashbots Protect RPC. So, the same key considerations might apply while sending private transactions through Defender (such as uncle bandit risk) |
Sending transactions
The easiest way to send a transaction via a Relayer is using the @openzeppelin/defender-relay-client npm package. The client is initialized with an API key/secret and exposes a simple API for sending transactions through the corresponding Relayer.
import { Relayer } from '@openzeppelin/defender-relay-client';
const relayer = new Relayer({apiKey: YOUR_API_KEY, apiSecret: YOUR_API_SECRET});

const tx = await relayer.sendTransaction({
  to, value, data, gasLimit, speed: 'fast'
});| You don’t need to enter a private key when initializing a Relayer client, since the private key is kept secure in the Defender vault. |
Currently, zkSync doesn’t have a way to precisely calculate gasLimit other than using the eth_estimateGas endpoint. Therefore, Defender can’t do any gasLimit and overrides the user input with the RPC estimation.
|
Using ethers.js
The Relayer client integrates with ethers.js via a custom signer. This allows you to switch to Defender Relayer for sending transactions with minimal changes in your codebase.
const { DefenderRelaySigner, DefenderRelayProvider } = require('@openzeppelin/defender-relay-client/lib/ethers');
const { ethers } = require('ethers');

const credentials = { apiKey: YOUR_API_KEY, apiSecret: YOUR_API_SECRET };
const provider = new DefenderRelayProvider(credentials);
const signer = new DefenderRelaySigner(credentials, provider, { speed: 'fast' });

const erc20 = new ethers.Contract(ERC20_ADDRESS, ERC20_ABI, signer);
const tx = await erc20.transfer(beneficiary, 1e18.toString());
const mined = await tx.wait();
In the example above, we are also using a DefenderRelayProvider for making calls to the network. The Defender signer can work with any provider, such as ethers.getDefaultProvider(), but you can rely on Defender as a network provider as well.
You can read more about the ethers integration here.
Using web3.js
The Relayer client integrates with web3.js as well as via a custom provider. This allows you to use Defender Relayer for sending transactions and querying the network using the familiar web3 interface.
const { DefenderRelayProvider } = require('@openzeppelin/defender-relay-client/lib/web3');
const Web3 = require('web3');

const credentials = { apiKey: YOUR_API_KEY, apiSecret: YOUR_API_SECRET };
const provider = new DefenderRelayProvider(credentials, { speed: 'fast' });
const web3 = new Web3(provider);

const [from] = await web3.eth.getAccounts();
const erc20 = new web3.eth.Contract(ERC20_ABI, ERC20_ADDRESS, { from });
const tx = await erc20.methods.transfer(beneficiary, (1e18).toString()).send();
In the example above, the transfer transaction is signed and broadcasted by the Defender Relayer, and any additional JSON RPC calls are routed via the Defender private endpoint.
You can read more about the web3 integration here.
EIP1559 support
Since not all of the networks Defender support are EIP1559 compatible, the EIP1559 transaction support is only enabled for those networks identified as compatible and enabled by the team.
A relayer can send EIP1559 transactions in the following ways:
-
Sending a transaction via UI with the
EIP1559Pricingpolicy enabled -
Sending a transaction via API with both
maxFeePerGasandmaxPriorityFeePerGasspecified -
Sending a transaction via API with
speedand with theEIP1559Pricingpolicy enabled
Once any transaction is sent, it will have the same type on every stage of its lifecycle (such as replacement and repricing), so it’s currently not possible to change the type if it’s already been submitted.
Any attempt to send maxFeePerGas or maxPriorityFeePerGas to non-EIP1559 compatible networks will be rejected and discarded by the relayer.
|
You can tell if a network supports EIP1559 by looking at the Relayer policies. If the EIP1559Pricing policy doesn’t show up, it means that we haven’t added EIP1559 support for that network.
| If you notice an EIP1559 compatible network that we already support but hasn’t support enabled, please don’t hesitate in request it on our Community Forum, or at defender@openzeppelin.com |
Private transactions
Private transaction support allows a Relayer to send transactions without being visible on the public mempool, and instead, the transaction is relayed via a private mempool using a special eth_sendRawTransaction provider, which will vary depending on the network and current support (such as Flashbots network coverage).
A relayer may send a private transaction in any of the following ways:
-
Sending a transaction via API with the
privateTransactionspolicy enabled -
Sending a transaction via API with
isPrivateparameter set totrue -
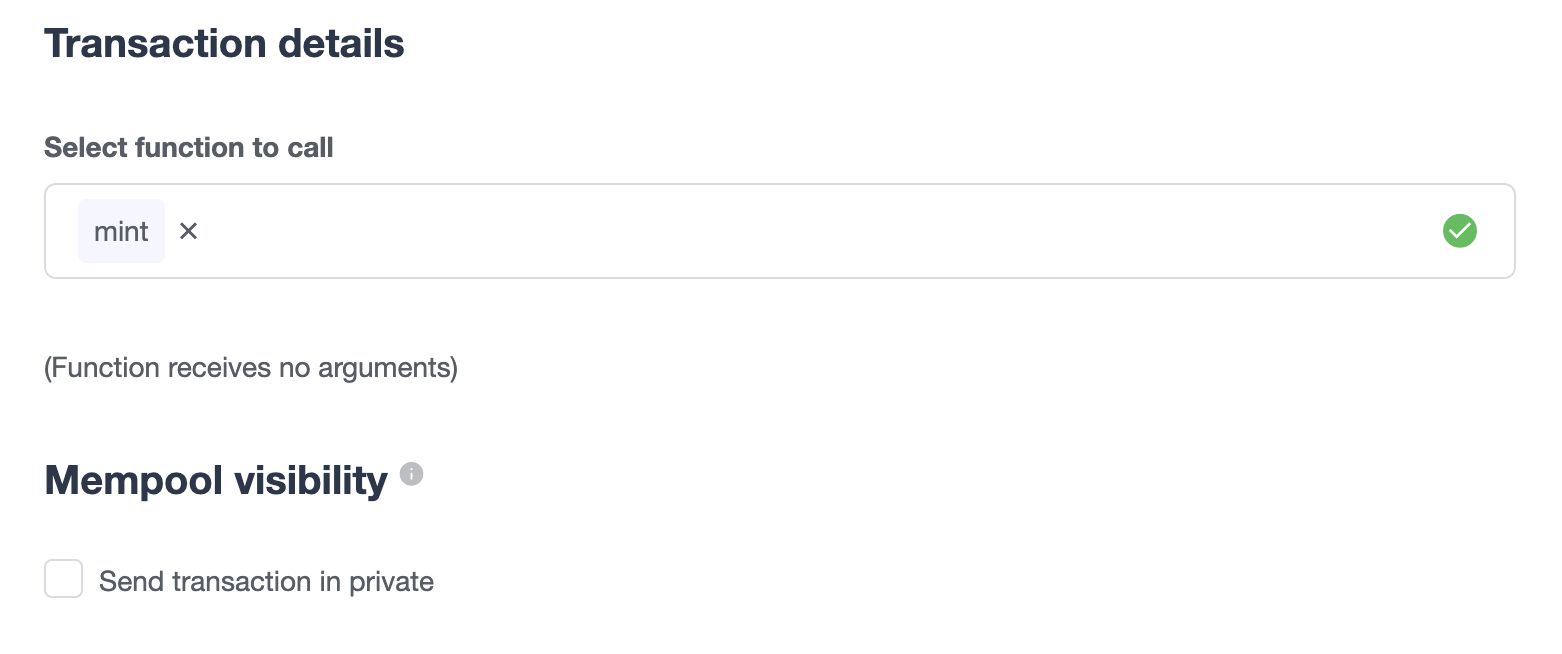
Sending a transaction via UI and checking the Mempool Visibility checkbox
Sending a transaction with the isPrivate flag set to true to a network that doesn’t support private transactions will be rejected and discarded by the relayer.
|
Currently, only the following network is supported
-
Mainnet: Via Flashbots Protect RPC
Key considerations for the eth_sendRawTransaction provider should be considered while using private transactions, such as uncle bandit risk.
|
Speed
Instead of the usual gasPrice or maxFeePerGas/maxPriorityFeePerGas, the Relayer may also accept a speed parameter, which can be safeLow, average, fast, or fastest. These values are mapped to actual gas prices when the transaction is sent or resubmitted and vary depending on the state of the network.
If speed is provided, the transaction would be priced according to the EIP1559Pricing relayer policy.
Mainnet gas prices and priority fees are calculated based on the values reported by EthGasStation, EtherChain, GasNow, BlockNative, and Etherscan. In Polygon and its testnet, the gas station is used. In other networks, gas prices are obtained from a call to eth_gasPrice or eth_feeHistory to the network.
|
Fixed Gas Pricing
Alternatively, you may specify a fixed gasPrice or a fixed combination of maxFeePerGas and maxPriorityFeePerGas for a transaction, by setting either the gasPrice parameter or maxFeePerGas and maxPriorityFeePerGas parameters. Transactions with a fixed pricing are either mined with the specified pricing or replaced with a NOOP transaction if they couldn’t be mined before validUntil time.
Keep in mind that you have to provide either speed, gasPrice, maxFeePerGas/maxPriorityFeePerGas or none, but not a mix between them in a send transaction request.
Whenever a send transaction request is sent without any pricing parameter, it will be priced with a fast default speed.
|
If you’re providing both fixed maxFeePerGas and maxPriorityFeePerGas, make sure that maxFeePerGas is greater or equal than maxPriorityFeePerGas. Otherwise, it’ll be rejected.
|
Valid Until
Every transaction in Defender Relay is valid for submission to the Ethereum network until validUntil time. After validUntil time the transaction is replaced by a NOOP transaction in order to prevent relayer from getting stuck at the transaction’s nonce. A NOOP transaction does nothing except advancing the relayer’s nonce.
validUntil defaults to 8 hours after the transaction creation. Note that you can combine validUntil with a fixed pricing to achieve extremely fast mining times and beating other transactions on gasPrice or maxFeePerGas.
If you’re using ethers.js, you may set a validForSeconds option instead of validUntil. In the example below, we configure a DefenderRelaySigner to issue a transaction which will be valid for 120 seconds after its creation.
const signer = new DefenderRelaySigner(credentials, provider, { validForSeconds: 120 });
validUntil is a UTC timestamp. Make sure to use a UTC timezone and not a local one.
|
Transaction IDs
Since the Relayer may resubmit a transaction with an updated gas pricing if it does not get mined in the expected time frame, the hash of a given transaction may change over time. To track the status of a given transaction, the Relayer API returns a transactionId identifier you can use to query it.
const tx = await relayer.query(tx.transactionId);
The query endpoint will return the latest view of the transaction from the Defender service, which gets updated every minute.
|
Replace Transactions
While a Defender Relay will automatically resubmit transactions with increased gas pricing if they are not mined, and will automatically cancel them after their valid-until timestamp, you can still manually replace or cancel your transaction if it has not been mined yet. This allows you to cancel a transaction if it is no longer valid, tweak its TTL, or bump its speed or gas pricing.
To do this, use the replaceByNonce or replaceById of the defender-relay-client:
// Cancel tx payload (tx to a random address with zero value and data)
replacement = {
  to: '0x6b175474e89094c44da98b954eedeac495271d0f',
  value: '0x00',
  data: '0x',
  speed: 'fastest',
  gasLimit: 21000
};

// Replace a tx by nonce
tx = await relayer.replaceTransactionByNonce(42, replacement);

// Or by transactionId
tx = await relayer.replaceTransactionById('5fcb8a6d-8d3e-403a-b33d-ade27ce0f85a', replacement);
You can also replace a pending transaction by setting the nonce when sending a transaction using the ethers or web3.js adapters:
// Using ethers
erc20 = new ethers.Contract(ERC20_ADDRESS, ERC20_ABI, signer);
replaced = await erc20.functions.transfer(beneficiary, 1e18.toString(), {
  nonce: 42
});

// Using web3.js
erc20 = new web3.eth.Contract(ERC20_ABI, ERC20_ADDRESS, { from });
replaced = await erc20.methods.transfer(beneficiary, (1e18).toString()).send({
  nonce: 42
});
You can only replace transactions of the same type. For example, if you’re trying to replace an EIP1559 transaction, it can’t be replaced with a legacy transaction. Also, if speed is provided instead, the transaction will be repriced as its original type requires with the given speed.
|
List Transactions
You can also list the latest transactions sent via your Relayer, optionally filtering by status (pending, mined, or failed). This can be particularly useful to prevent your Autotask scripts from re-sending a transaction already in-flight: before sending a transaction, you can use the list method filtered by pending status to see if there is a transaction in the queue with the same destination and calldata as the one you are about to send.
const txs = await relayer.list({
  since: new Date(Date.now() - 60 * 1000),
  status: 'pending', // can be 'pending', 'mined', or 'failed'
  limit: 5, // newest txs will be returned first
})
Signing
In addition to sending transactions, the Relayer can also sign arbitrary messages according to the EIP-191 Standard (prefixed by \x19Ethereum Signed Message:\n) using its private key. You can access this feature via the sign method of the client or the equivalent ethers.js method.
const signResponse = await relayer.sign({ message });| As opposed to most libraries, Relayers use non-deterministic ECDSA signatures. This means that if you request a Relayer to sign the same message multiple times, you will get multiple different signatures, which may differ to the result you get by signing using ethersjs or web3js. All those different signatures are valid. See RFC6979 more information. |
Signing Typed Data
Along with the sign api method, the Relayer also implements a signTypedData, which you can use to sign messages according to the EIP712 Standard for typed data signatures.
You can either provide the domainSeparator and hashStruct(message) or use the equivalent ethers.js method
const signTypedDataResponse = await relayer.signTypedData({
  domainSeparator,
  hashStructMessage
});
Relayer Info
A relayer’s address can be retrieved using the getAddress method of the DefenderRelaySigner class.
const address = await signer.getAddress();If you need more info about a relayer then checkout the getRelayer method of the client. It returns the following data:
const info = await relayer.getRelayer();
console.log('Relayer info', info);

export interface RelayerModel {
  relayerId: string;
  name: string;
  address: string;
  network: string;
  paused: boolean;
  createdAt: string;
  pendingTxCost: string;
}
Relayer Status
To gain better insight into the current status of a relayer, one can use the getRelayerStatus method from the DefenderRelaySigner class. This method provides real-time information about a relayer, such as its nonce, transaction quota, and the number of pending transactions.
const address = await signer.getRelayerStatus();If you need info about a Relayer then checkout the getRelayer method of the client. It returns the following data:
export interface RelayerStatus {
  relayerId: string;
  name: string;
  nonce: number;
  address: string;
  numberOfPendingTransactions: number;
  paused: boolean;
  pendingTxCost?: string;
  txsQuotaUsage: number;
  rpcQuotaUsage: number;
  lastConfirmedTransaction?: {
    hash: string;
    status: string;
    minedAt: string;
    sentAt: string;
    nonce: number;
  };
}
Network calls
Defender also provides an easy way to make arbitrary JSON RPC calls to the network. You can use the low-level relayer.call method to send any JSON RPC HTTP request:
const balance = await relayer.call('eth_getBalance', ['0x6b175474e89094c44da98b954eedeac495271d0f', 'latest']);If you are using ethers.js, this is supported via a custom DefenderRelayProvider provider object:
const provider = new DefenderRelayProvider(credentials);
const balance = await provider.getBalance('0x6b175474e89094c44da98b954eedeac495271d0f');
Autotasks integration
A Relayer can be attached to an Autotask, a code snippet that is run by Defender. When doing so, the Autotask code will have direct access to the attached Relayer methods without requiring you to specify an API key. Instead, Defender will inject short-lived credentials for your Relayer in your Autotask handler function.
const { Relayer } = require('@openzeppelin/defender-relay-client');

// The credentials object is injected by the Defender Autotasks engine
exports.handler = async function(credentials) {
  const relayer = new Relayer(credentials);
  // ... use relayer as usual
}| Autotasks can be invoked either on a scheduled basis or via a webhook. If you want to call your Relayer from a webapp, the recommended way is to do so via an Autotask triggered through a webhook. Never place your Relayer API key and secret in a frontend, since anyone with those keys would have unrestricted control over your Relayer. |
Meta-transactions
Defender Relayers are general-purpose relayers, in the sense that you can use them to send any transaction you want to your contracts. In particular, they can also be used for relaying meta-transactions on behalf of your users. A simple setup for this requires setting up a server-side function that decides whether or not to relay a given meta-transaction, and then calls the Defender Relayer for effectively sending it.
In particular, you can use Autotasks to host that function and invoke it via webhooks. You can read more about webhook activated Autotasks here.
EIP2771 GSNv2-compatible meta-transactions
We have created a demo application for Defender-powered meta-txs here. This application relies on an EIP-2771 Forwarder contract. This contract’s sole responsibility is to receive a signed meta-tx request, verify its signature, and forward the request to a recipient contract by appending the signer address to the call.
This setup is compatible with GSNv2, meaning that you can use a Defender Relayer for sending your meta-transactions, and at any point in the future, you can switch to the decentralized network of GSN relayers without any changes to your contracts.
| You can explore the key parts of the code for the application here. |
More meta-transaction patterns
The pattern described above is just one variant among several meta-transaction flavors available. Given that Defender Relayers are general-purpose, you can also use them for any other type of meta-transactions, such as relaying gasless ERC20 transfers using EIP2612 or EIP3009.
In particular, you can leverage Defender xDai Relayers for sending transactions on behalf of your users in xDai, given the low cost of transactions in that sidechain. This way, you can offer a full gasless experience in your dapp. The same applies to other sidechains supported in Defender, such as BSC, Fuse, Fantom, Polygon, Avalanche, Celo, Moonbeam, Moonriver, Aurora, Harmony and Arbitrum.
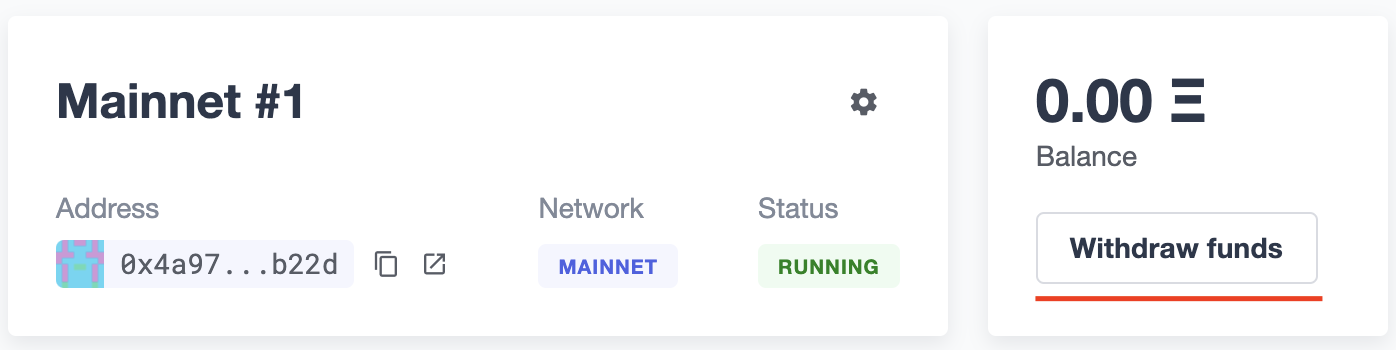
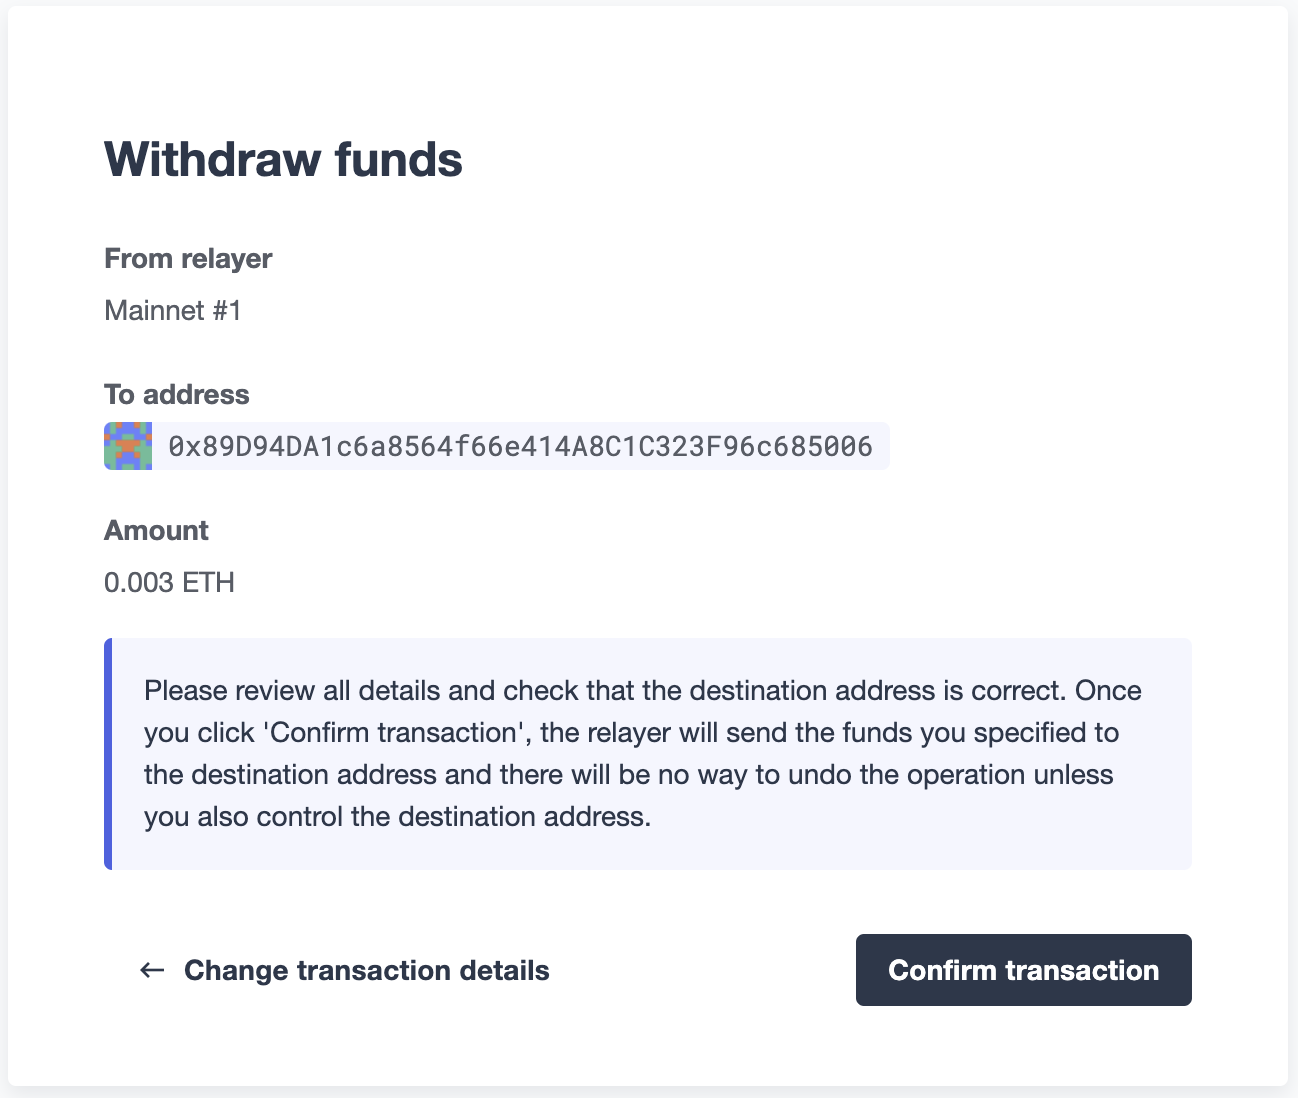
Manual operation
You can also manually send transactions through a Relayer or withdraw funds from it directly from the Defender site. To do so, go to the Relayer page, open the cog menu, and choose the option you want.
Sending transactions
You can manually send a transaction to a contract from your Relayer by choosing Send transaction in your relay cog menu:

At the Send transaction screen, enter the address of the contract you want to interact with, select a function to execute, and enter its arguments.
| At the time of writing, Defender only supports sending transactions to source verified contracts, so make sure the target contract has been verified either on Etherscan or Sourcify. |
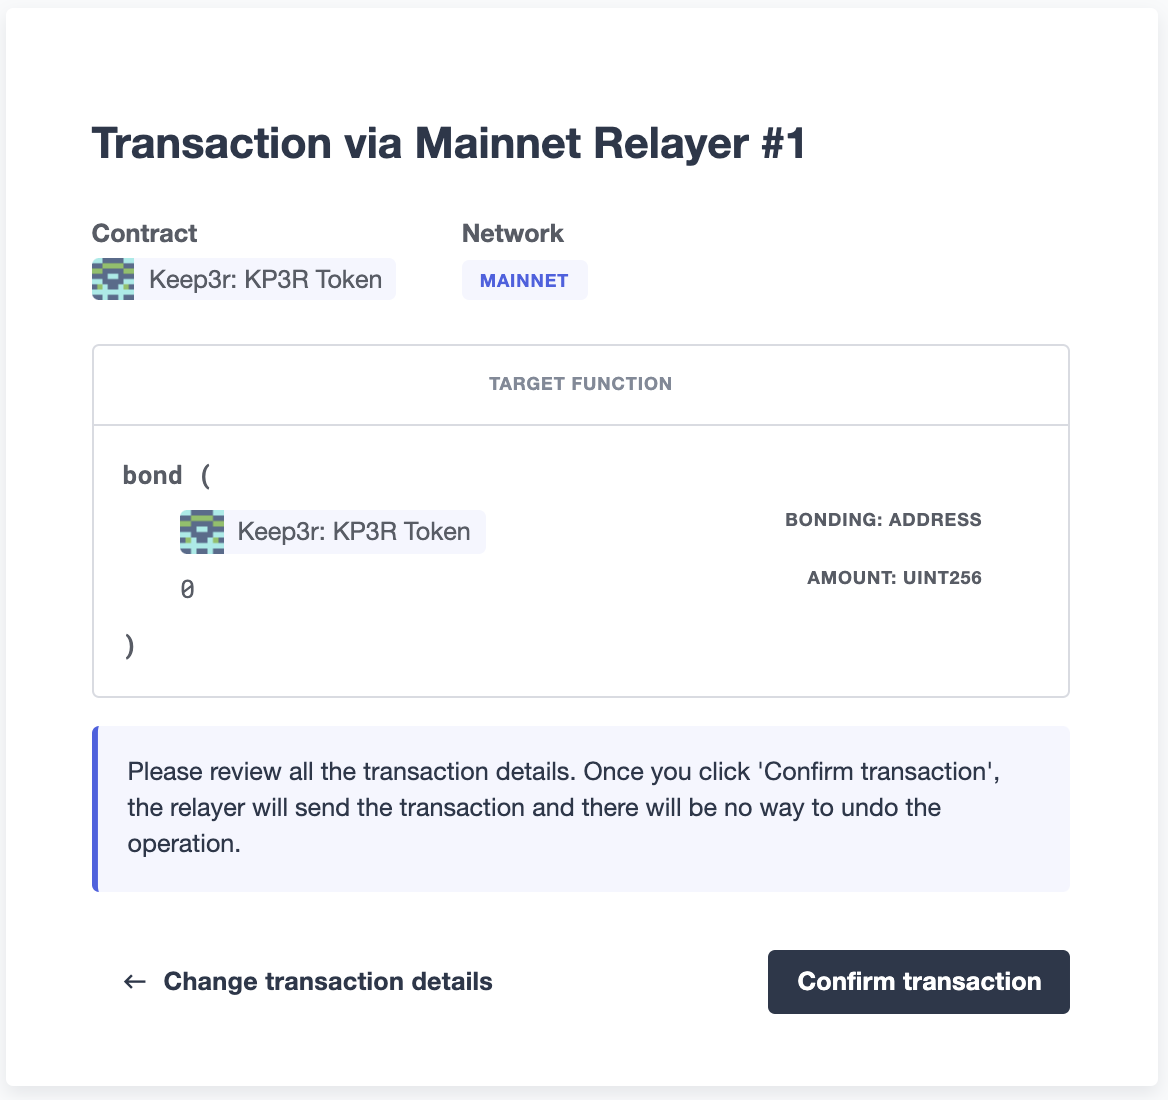
When you click on Confirm transaction, the transaction will be sent through the relayer. We suggest that you wait for the transaction to be confirmed before leaving this screen, or to monitor it on your block explorer of choice, to ensure that it is confirmed and there is no further action required from you.
| Defender sets speed to Fast for relayer transactions created through the UI. |
Under the hood
Each Relayer is associated to a private key. When a request to send a transaction is received, the Relayer validates the request, atomically assigns it a nonce, reserves balance for paying for its gas fees, resolves its speed to a gasPrice or maxFeePerGas/maxPriorityFeePerGas depending on its EIP1559 pricing policy, signs it with its private key, and enqueues it for submission to the blockchain. The response is sent back to the client only after this process has finished. Then, the transaction is broadcasted through multiple node providers for redundancy and retried up to three times in case APIs are down.
Every minute, all in-flight transactions are checked by the system. If they have not been mined and more than a certain time has passed (which depends on the transaction speed), they are resubmitted with a 10% increase in their respective transaction type pricing (or the latest pricing for their speed, if it’s greater), which could be up to a 150% of the reported gas pricing for their speed. This process causes the transaction hash to change, but their ID is preserved. On the other hand, if the transaction has been mined, it is still monitored for several blocks until we consider it to be confirmed.
Concurrency and Rate Limiting
Relayers assign nonces atomically which allows them to handle many concurrent transactions. However, there do exist limits to optimize the infrastructure (all numbers below are cumulative of all relayers in an account):
-
120 transactions/hour (free tier only)
-
100 total requests/second
-
10 transactions/second
Security considerations
All private keys are stored in the AWS Key Management Service. Keys are generated within the KMS and never leave it, i.e., all sign operations are executed within the KMS. Furthermore, we rely on dynamically generated AWS Identity and Access Management policies to isolate access to the private keys among tenants.
As for API secrets, these are only kept in memory during creation when they are sent to the client. After that, they are hashed and stored securely in AWS Cognito, which is used behind the scenes for authenticating Relayer requests. This makes API keys easy to rotate while preserving the same private key on the KMS.
Hedera Support
On the Hedera network, only testnet is supported by Defender Relay at this time. Once the Hedera JSON RPC Relay service is out of beta, Defender will provide Hedera Mainnet support.